
When you import a Lasergene or Genbank sequence into GeneQuest, features from the document are placed as annotation methods at the bottom of the Method Curtain. GeneQuest also lets you create new annotations to label areas of interest in your DNA sequence. A feature can be composed of one or more segments.
A feature can be composed of one or more segments. Using the Feature Editor, both the feature and its segments can be annotated independently or joined under a common heading and description.
To create a new feature:
- Activate the Range selector (
![]() ).
).
 ).
).- Select a range or starting residue. To use the currently highlighted range of sequence as the first segment, highlight an area of interest. To use the residue that the cursor was last resting on (even if the cursor line is not visible at present), position the cursor at the desired point.
- Do one of the following:
- Click on the Annotation tool ( (
![]() )).
)).
- Select Sites & Features > New Feature.
- Press Ctrl/Cmd+K.
- Right-click anywhere on the document window and choose New Feature.
- Click on the Annotation tool ( (
 )).
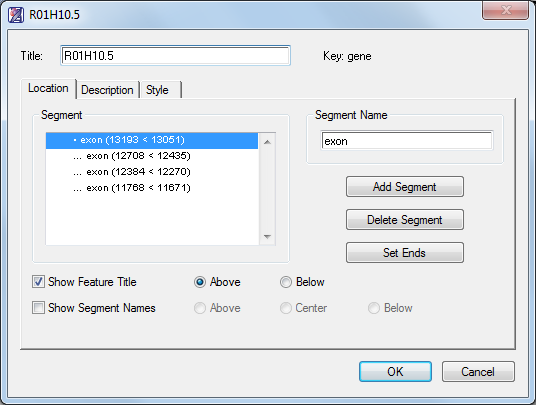
)). - Use the Location, Description, and Style tabs to assign a design style, font, size and color for the feature. You can also make notes about the feature and assign a keyword description.
To edit an existing feature:
- Do either of the following:
- Double-click on the feature.
- With the Range selector (
![]() ) active, click on the feature, and then select Sites & Features > Edit Feature.
) active, click on the feature, and then select Sites & Features > Edit Feature.
- Double-click on the feature.
- Use the Location, Description, and Style tabs to assign a design style, font, size and color for the feature. You can also make notes about the feature and assign a keyword description.
To link two or more features together:
Use this option to join a selected region as a new segment in an existing feature annotation.
- Activate the *Range selector*(
![]() ).
).
- Select a range that you wish to add to an existing feature.
- Choose Sites & Features > Join to Feature or click on the Joining Tool tool (
![]() ).
).
 ).
).- Specify which feature to append your region onto and click Join.
Except for having a different range, the new segment will have all the same Location, Description and Style characteristics as the segment it is appended to.
To generate a feature based on a region plot:
- Apply one or more methods whose results are displayed as region plots (
![]() ) .
) .
 ) .
) .- Select the region plot(s) using the Object selector (
![]() ).
).
 ).
).- Select Sites & Features > Generate Features.
- If you have selected different region plots for the same method (e.g., two ORF plots from Coding Prediction – Starts, Stops, ORFs), a dialog box opens.
- Choose whether you wish to combine related decisions or make all separate features. The former causes a single joint feature display to be created, while the latter creates separate displays for each of the varieties.
- Click OK. Results appear as one or more new displays at the bottom of the GeneQuest assay document.
To sort features:
Use the Sites & Features > Sort Features command to sort the features listed in the method curtain.
- Type – Sorts by feature type, or key.
- Name – Sorts by feature name.
- Position – Sorts by position on the sequence.
By default, features are sorted by Position.
Need more help with this?
Contact DNASTAR