
The Options section is located in the Features panel and, in some circumstances, lets you edit the bounds of secondary structure elements and/or change their descriptions.
Opening the Options section:
Do either of the following:
- Click the expand bar entitled “Options”
- Use View > Features > Options
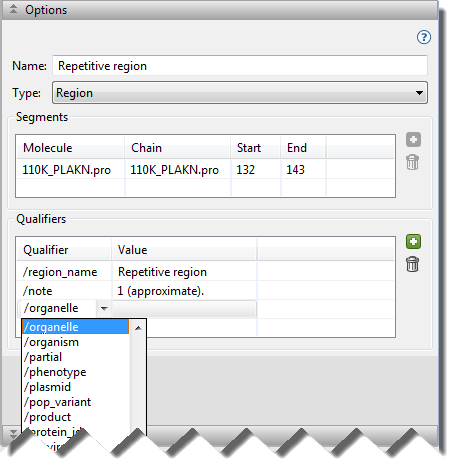
The Feature Options section appears similar to the image below:
Tools in the Options section:
| Tool | Name | Description |
|---|---|---|
 |
Create a segment | To create a new feature segment from a selected range of sequence. |
 |
Delete a segment | To delete the selected segment. |
| |
Add a qualifier | To create a new qualifier for a selected feature. |
| |
Delete a qualifier | To delete the selected qualifier. |
Tasks that can be done within the (feature) Options section:
Before performing any of the tasks below, you must first select one or more items from the Features panel or in the (feature) Options section itself. If you select a sequence file feature, user-created feature, or a structural element in a PDB file, the (feature) Options dialog is enabled. If you select a PDB site, however, all options in the dialog are disabled.
Any changes made in this dialog are reflected in the Name and/or Details columns of the Features panel and on the Features track, if it is displayed in the Analysis view.
| Task | How To |
|---|---|
| To change the feature name | Overwrite the default name in the Feature name box. Note: If multiple features are selected in the Features panel, you can change the name and type for all of them simultaneously. The effect is similar to what will happen in a true multiple chain feature, except that the individual features are displayed in the Features panel. |
| To change feature type | Make a selection from the Feature type drop-down menu. Available options include Region, Site, Hypervariable, Binding, Active, Helix, Sheet, Disulfide, and Missing. When you make a new selection, the feature automatically moves to the corresponding category in the Feature panel. Note: If multiple features are selected in the Features panel, you can change the name and type for all of them simultaneously. The effect is similar to what will happen in a true multiple chain feature, except that the individual features are displayed in the Features panel. |
| To change the start and end points for the feature or one of its segments | Insert the cursor into a Start or End cell and overwrite the original entry with a new number. |
| To add a new segment to an existing feature | Select the target feature in the Features panel. Then, from any Protean 3D view, select the desired range for the new segment. The selection must be on the same chain as the original feature. In the Options section’s Segment portion, click the Create a segment tool () to add a new segment row to the table. This tool is only enabled when the current selection is different from the existing segments. Note that after creating a new segment, you may need to manually reselect the feature in the Feature panel before adding another segment. |
| To delete a segment | To delete a segment from a multi-segment feature (i.e., two or more segments on a single chain), select the corresponding row in the Options section’s Segment portion and press the Delete a segment tool (). If the feature only has one segment, this tool is disabled. |
| To add a new qualifier to an existing feature, or to edit an existing qualifier | Select the target feature in the Features panel. In the Qualifier section, click the Add a qualifier tool () to add a new row to the table. In the Qualifier column of the new row, use the drop-down menu to choose the type of qualifier from a list. In the Value column, type in the desired text. Edits can be made to existing qualifiers in the same way. |
| To delete a qualifier | To delete a qualifier, select the corresponding row in the Qualifiers section and press the Delete a qualifier tool (). |
Need more help with this?
Contact DNASTAR