
Site-directed mutagenesis is a molecular biology method that is used to make specific changes to the DNA sequence of a gene. As of Lasergene 16.0, you can perform site-directed mutagenesis using Protean 3D’s Protein Design service together with SeqBuilder Pro. The following case study is based on a poster that DNASTAR presented at the 2019 PEGS Summit in Boston.
Introduction:
Nature commonly evolves proteins to provide sufficient fold stability to optimize its activity—not its energetic stability. Lasergene’s site-directed mutagenesis workflow is designed to help improve the developability of a protein by predicting which mutations may lead to increased protein stability and developability.
In the following example, we’ll use Lasergene’s site-directed mutagenesis workflow to replicate the findings of Lim, et al., 1994 (Proc. Natl. Acad. Sci. USA, 91:423-7). Lim made three specific mutations to the repressor protein cl. This protein is part of the lambda P50 operon (PDB ID: 1LMB), which also includes the genes rexa and rexb.
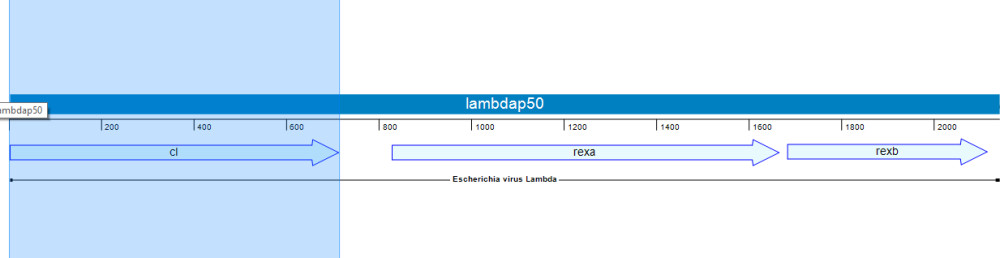
Lim’s study found that mutating the repressor protein cI at three specific points conferred 0.5 kcal/mol more stability compared to the wild type.
As we describe below, Lasergene’s site-directed mutagenesis workflow not only replicates Lim’s findings, but early on—in Step #2—reveals other mutations that could be even more stabilizing. Our results were presented by us in a poster at the 2019 PEGS conference.
Note: The coordinates in this blog post match the current PDB structure, not the coordinates reported from the 1994 paper or the poster cited above. UniProt indicates position 1 is a removed initiator methionine and the chain starts at position 2 (serine). By contrast, RCSB numbers the start of the chain after post-translational modification as position 1. This blog post uses a sequence that follows the UniProt convention rather than the RCSB convention.
Part I: Scan for hotspots and create variants on protein structure
Since we have a protein structure as our starting point, we will begin with the following steps. If a protein structure was not available, we could instead start by creating variant primers as shown in Part II.
- Launch Protean 3D and use File > Open from PDB to open the protein sequence 1LMB.
We will begin by performing “hot spot scanning” using alanine. This hot spot workflow is used to predict folding hot spots; residues that contribute to fold stability more significantly than others. The more destabilizing the alanine variant, the greater the probability the position and residue identity is important to the fold.
- Choose Modeling > Protein Design > Scan for Hot Spots With > Document. Keep all defaults and choose Run.
In approximately a minute or less, the results of the alanine scan appear in the Report view. The Prediction column indicates that the positions referenced by Lim—36, 40 and 47—are all predicted to be “destabilizing.”
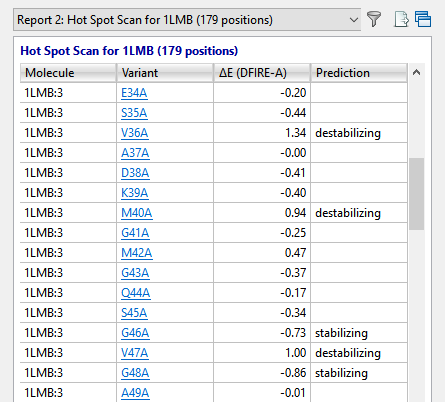
The Report contains several residues that are even more destabilizing (i.e., have higher DFIRE-A potentials) than the ones in Lim’s 1994 paper. Ideally, these would be our first choice for increasing the developability of the protein. However, for purposes of replicating Lim’s findings, we will proceed with the three positions referenced above.
- To manually insert variants into these positions of interest, choose Modeling > Protein Design > Create Variant With > Document. Then use the Substitute drop-down menus to change position 36 from V to L; position 40 from M to L; and position 47 from V to I.
If we weren’t replicating Lim’s study, which amino acids would we substitute for the originals? Unfortunately, there is no “magical” way to determine which variants will work best. We can simply run different combinations and see which ones lead to increased stability.
Press Run. The new Report shows that this combination of variants is predicted to be “stabilizing.”

Part II: Introduce variants in sequence and create mutated primer
- Launch SeqBuilder Pro and use File > Open to open the original (unmutated) 1LMB protein sequence.
- Reverse translate the sequence to DNA. (We also created annotations showing the locations of the three variants—these appear in the image in Step 5). Choose File > Save.
- Select all nucleotides from the beginning of the cl gene to the right (downstream) of the sequence and delete them. Then use File > Save As to save the remaining fragment as Upstream fragment.sbd.
- Open the sequence saved in Step 2, above. Select all nucleotides to the left (upstream) of the cl gene and delete them. Then use File > Save As to save the remainder of the sequence as cl mutated fragment.sbd.
We now have two sequence files that—laid end to end—would be identical to the original nucleotide sequence.
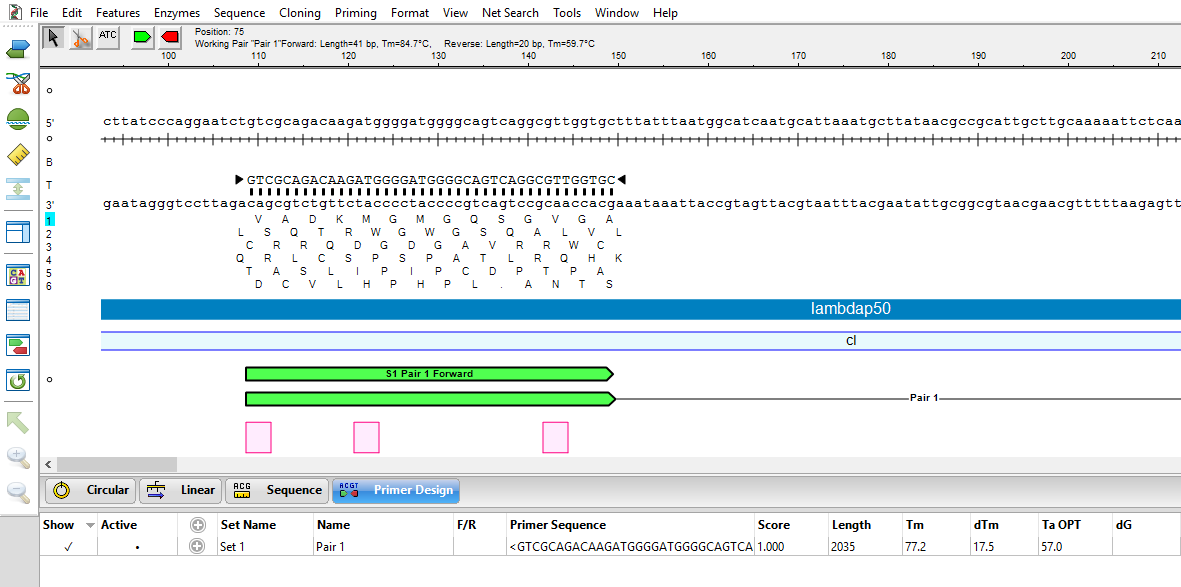
- In this step, we will use the Primer Design view to create PCR primer pairs at the exact desired location with respect to features and translational frames. Choose Edit > Select All, then Priming > Create Primer Pairs. Keep the default setting Primers end exactly at selection and press OK. Once the primers are created, the forward primer is extended to 41 bp in length to fully cover all three mutation areas.
The image below shows that the three codons where the variants will be introduced (pink) all occur on the forward primer (green).
- Next, we need to recreate the variants of interest using the Introduce Codon Change/Mutation tool (
![]() ). This tool allows us to easily modify triplet codons within primers to introduce the desired mutations. Select the tool, then hover over the first codon (V in Reading Frame 1) and choose the desired substitute: L.
). This tool allows us to easily modify triplet codons within primers to introduce the desired mutations. Select the tool, then hover over the first codon (V in Reading Frame 1) and choose the desired substitute: L.
 ). This tool allows us to easily modify triplet codons within primers to introduce the desired mutations. Select the tool, then hover over the first codon (V in Reading Frame 1) and choose the desired substitute: L.
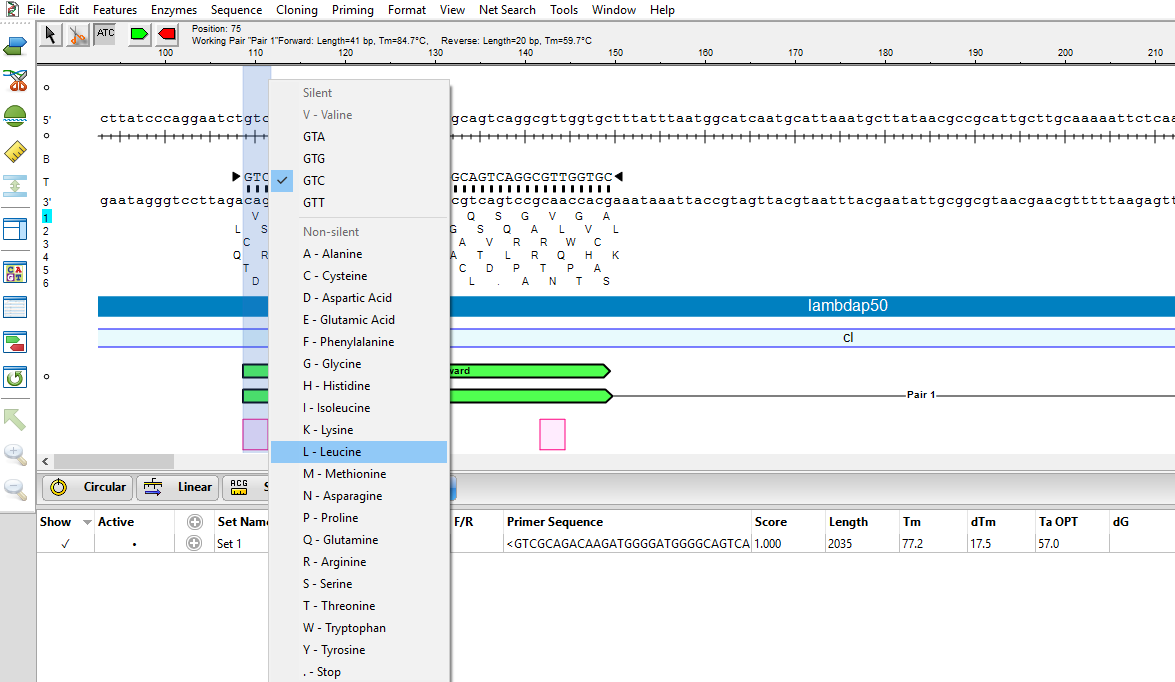
- In the same way, introduce the planned variants at the second and third codons. The mutated bases are represented by a pink lower case font, as shown below.
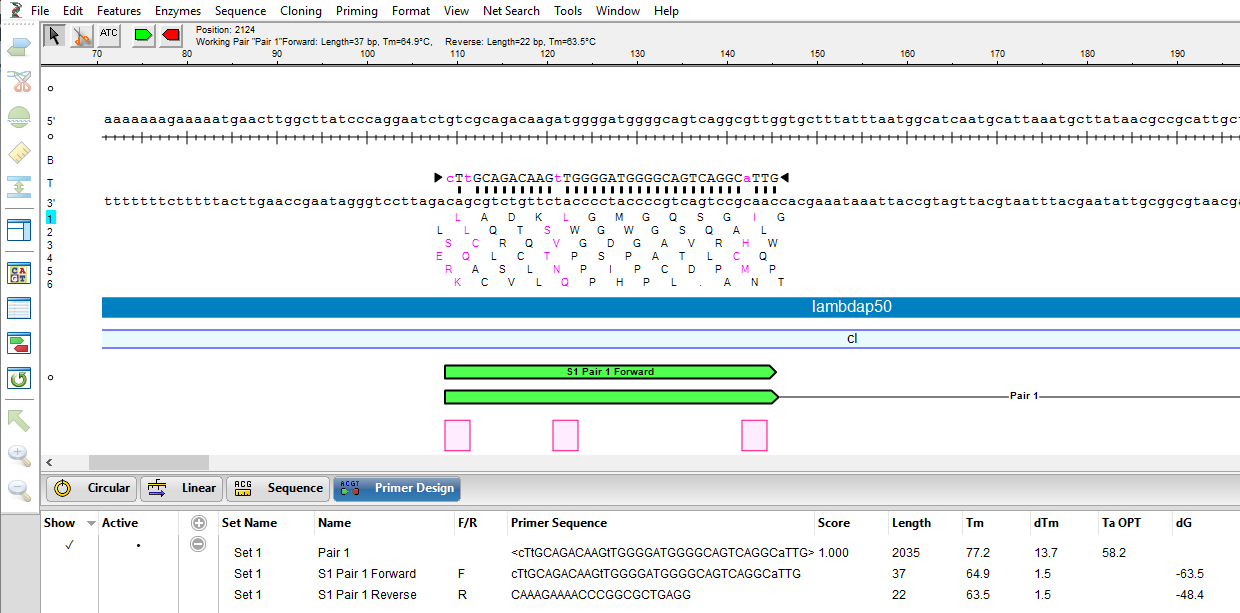
At this point, either or both primers could be further adjusted to improve T~m~ differences and primer-dimer formation.
- Save the cl mutated fragment.sbd project using File > Save.
- Reopen the sequence fragment Upstream fragment.sbd and create primer pairs using the commands in Step 4, above. Save the project using File > Save.
SeqBuilder Pro provides multi-fragment PCR based cloning options so that the mutated gene of interest can be cloned into an appropriate expression vector. In the next steps, we will clone the mutated cI gene (and the rest of the lambdap50 operon) and the upstream (non-mutated) fragment of the cI gene into an E.coli expression vector system (pBAM/Thio) using PCR-based Gibson assembly.
- Open a new, empty cloning project using File > New Cloning Project.
- Click on the Inserts folder to select it. Then right-click on the Inserts folder and choose Import. Use Ctrl+click (Win) or Cmd+click (Mac) to select the files cl mutated fragment.sbd and Upstream fragment.sbd, then click Open.

- Choose Cloning > Gibson, LIC Cloning.
- Next to Experiment, type in cl gene mutant.
- Use the Vector drop-down menu and click the plus sign next to Restriction Vectors to expand the folder. Then click on the first vector in that folder, pBAD/THIO.
- Drag the two sequence fragments from the Inserts folder and drop them in the Fragments area on the bottom right. Make sure the upstream fragment is on top. In the cloning dialog, name it cl gene mutant.
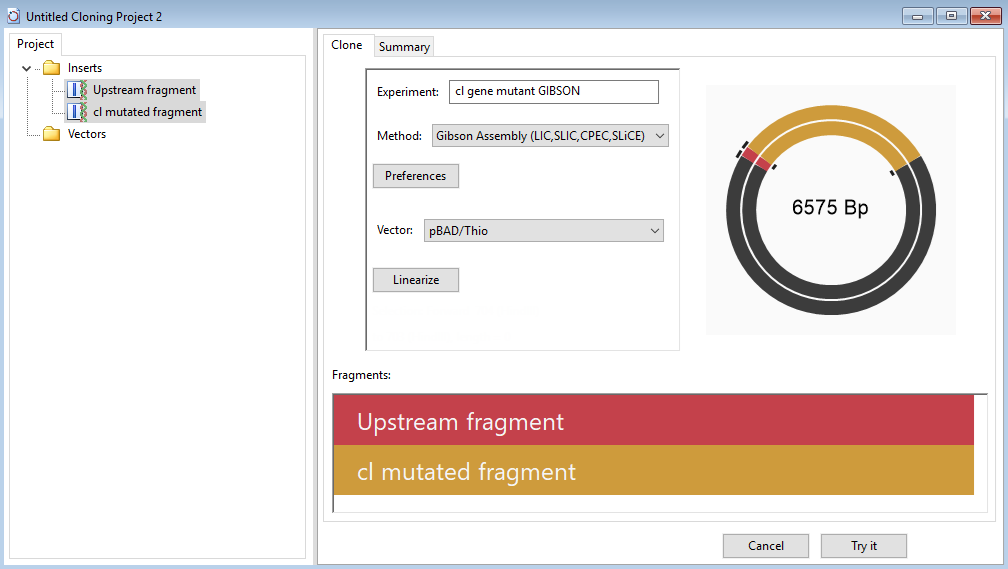
- Press the Linearize button and specify a Left Cut at NaeI (676) and Right Cut at HindIII (703). Press Select.
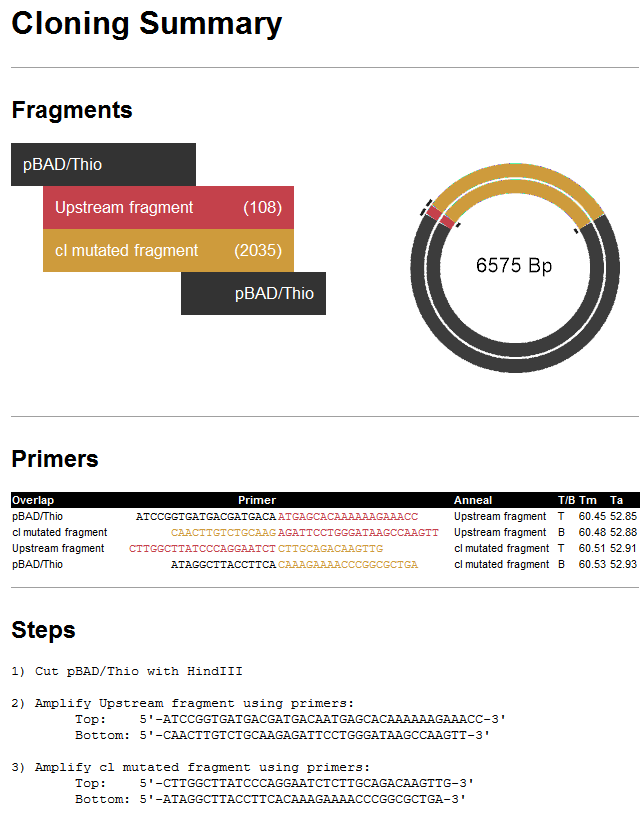
- Press Try it, then Make it. The History view shows a rendering of the fragments and clone, all primer information, and the list of steps needed to create the clone in the lab. The red text in the Primers area is the junction that puts the two sequence fragments back together.
- Open expression clone cl gene mutant GIBSON Clone 1 in SeqBuilder Pro by double-clicking on it.
The Linear view shows all the of the vector and insert feature annotations and lets us apply ORF detection and translation to confirm that the gene of interest remains in-frame with the fusion protein.
- Apply the ORF for “Top Frame 1,” shown as a red bar in the image below. The small white triangles along the ORF denote the atg start sites.
- Click on the start site corresponding to hpTrxA, a mutated version of the E. coli protein thioredoxin (trxA) used to create a metal-binding domain that allows purification of thioredoxin fusion on metal-chelating resins.

The selection contains the entire cl gene feature; verification that the transcript is in-frame.
Need more help with this?
Contact DNASTAR