
To specify the features to use in auto-annotation:
Specifying which features to use in auto-annotation is optional.
- Choose Features > Feature Library Manager. This automatically loads the installed database file named feature.library. The Feature list on the left of the Feature Library Manager is populated with the name of each feature in the installed database, but the rest of the window is unpopulated.
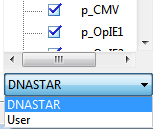
- (optional) To choose a different feature database, use the drop-down menu under the list. DNASTAR represents the installed library features, while User represents a custom database.
- To populate the remainder of the window, select a feature from the Feature list by clicking on its name. You can select multiple features using Ctrl/Cmd+click or Shift+click, but sequence bases, translations and cut sites will not be displayed in this case. Multiple selection is used primarily to apply style changes to a number of library items simultaneously (see below).
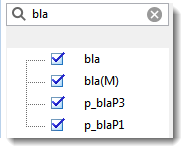
To find a feature of interest, type its name (or a portion of its name) in the search bar above the list and press Enter/Return on the keyboard. To clear search results and return to the full list, press the ‘x.’
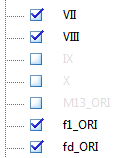
- To specify which features to include/exclude from an auto-annotation search, check or uncheck the boxes next to their names. By default, all features on the list are checked. Unchecked features are grayed out.
- To save changes made in the Feature Library Manager, choose File > Save Project. These are the two types of changes that are preserved even when you update from one Lasergene version to another:
- The presence or absence of check marks in the Feature list on the left. Unchecked items will not be considered when searching for matches in the Annotation Results window.
- Changes made in the Features pane (for changing the format style) are used in auto-annotation of features in the Annotation Results window.
- The presence or absence of check marks in the Feature list on the left. Unchecked items will not be considered when searching for matches in the Annotation Results window.
Need more help with this?
Contact DNASTAR