
Depending on the workflow, the Input Sequences screen may include an Experiment setup drop-down menu. You must make a selection from this menu before proceeding to the next screen.
To run each sample individually:
- Specify the Read technology using the drop-down menu.
- Choose Single sample from the Experiment setup drop-down menu.
- Check or uncheck the Paired-end data box as applicable to your data and enter a pair distance when prompted.
- Add the sequence files. In most cases, this will be done using the Add or Add Folder buttons on the right.
- Press Next.
To run multi-sample data without replicates as one or multiple assemblies:
- Specify the Read technology using the drop-down menu.
- Choose Multi-sample from the Experiment setup drop-down menu. If you choose this option, an Experiment column is added to the sequence file table.
- Check or uncheck the Paired-end data box as applicable to your data and enter a pair distance when prompted.
- Specifiy whether you want to create a separate assembly for each sample or to run all samples as a single assembly.
- To create a separate assembly for each sample, uncheck the box next to Run samples in single assembly. When multi-sample assemblies are run separately, each data set is run against the reference sequence independently and an .assembly package is created for each sample.
- To create a single assembly, check the box next to Run samples in single assembly. This is a common workflow to use with Sanger reads (e.g., .abi and .ab1 files) and is commonly referred to as “assemble in groups”.
- Add the sequence files. In most cases, this will be done using the Add or Add Folder buttons on the right.
- Replace each blank Experiment cell with a name; this must be done before you can proceed to the next screen. Data files that share identical names in this column will be assembled together.
- To assign experiment names automatically based on a portion of the name (recommended), use the Group Selection Tool at the bottom of the screen. In the box, select only the unique portion of the sample name, i.e., the part that changes from one sample to the next. This causes the Experiment column to change accordingly and to become simplified.
![]()
- To assign experiment names manually, click on each individual cell and type in a name. All rows with identical Experiment names will be treated as a group.
- To assign experiment names automatically based on their file names minus the file extensions, select one or more rows using click, Ctrl+click, Cmd+click or Shift+click and then press the Auto Name button.
- To group and name experiments, select one or more rows and press the Group Selected button. A popup will appear prompting you to type in a name for the selected file(s). Any names assigned to the row before using Group Selected will be overwritten.
- To remove experiments from a group, select one or more rows and press the Ungroup Selected button. In the selected rows, the Experiment column will return to its original (blank) state.

- Verify that the expected number of samples and assemblies are shown in the bottom right corner of the screen.

- Press Next. Note that a Set Up Experiments screen will be included among subsequence wizard screens.
To run multi-sample data with replicates as a single assembly:
When multi-sample data is run as a single assembly process, the data from all the samples are processed together and a single .assembly package is produced. In that case, there is a single alignment view with the data separated into the corresponding sample groups, each with a pseudo-consensus. Note that in assembling multi-sample data as a single assembly, SeqMan NGen considers all samples together. This can affect the final gapped alignment and therefore potentially yield slightly different results than assembling each sample individually.
- Specify the Read technology using the drop-down menu.
- Choose Multi-sample with replicates from the Experiment setup drop-down menu. When you choose this option, a Replicate column is added to the sequence file table.
- Check or uncheck the Paired-end data box as applicable to your data and enter a pair distance when prompted.
- Add the sequence files. In most cases, this will be done using the Add or Add Folder buttons on the right.
- Replace each blank Replicate cell with a name; this must be done before you can proceed to the next screen. Data files that share identical names in this column will be treated as replicates.
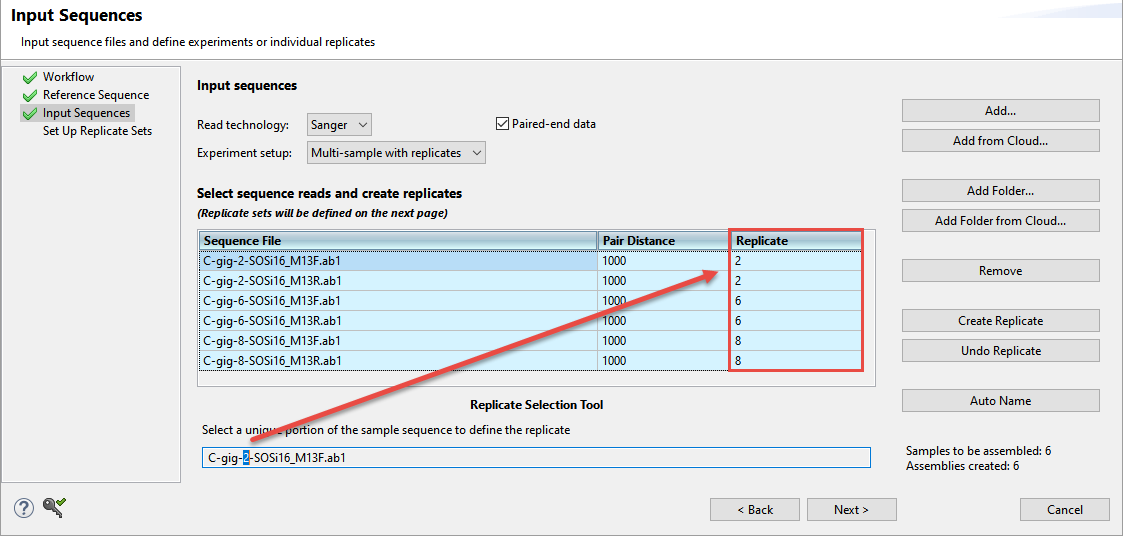
- To assign replicate names automatically based on a portion of the name (recommended), use the Replicate Selection Tool at the bottom of the screen. In the box, select only the unique portion of the sample name, i.e., the part that changes from one sample to the next. This causes the Replicate column to change accordingly and to become simplified.
![]()
- To assign replicate names manually, click on each individual cell and type in a name.
- To assign replicate names automatically based on their file names minus the file extensions, select one or more rows using click, Ctrl+click, Cmd+click or Shift+click and then press the Auto Name button.
- To group and name replicates, select one or more rows and press the Create Replicate button. A popup will appear prompting you to type in a name for the selected replicates. Any names assigned to the row before using Create Replicate will be overwritten.
- To remove items from a replicate group, select one or more rows and press the Undo Replicate button. In the selected rows, the Replicate column will return to its original (blank) state.
- Verify that the expected number of samples and assemblies are shown in the bottom right corner of the screen.

- Press Next. Note that a Set Up Replicate Sets screen will be included among subsequence wizard screens.
Need more help with this?
Contact DNASTAR