
SeqNinja lets you view sequence annotations from any sub-range step in the Visual view. You can also set ends automatically based on one or more features.
Start by creating a sub-range step using any of the methods described in Set sequence ends. The step initially appears as follows:

Next, choose a sequence and enter the desired sub-range. Two shaded “wheels” appear under the range boxes and display the sequence surrounding each coordinate.
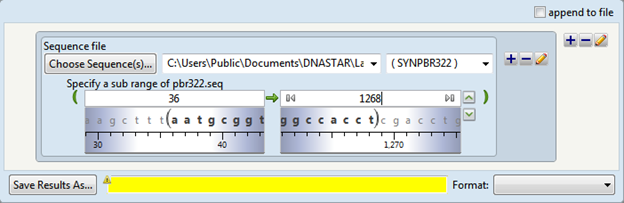
To view features, click the downward-pointing chevron to the far right of the range boxes ( ). Features appear below the wheels. If you are sure that your sequence contains features, but you do not see any after clicking the green arrow, use one of the methods in the table below to scroll along the sequence.
The sequence and feature displays treat all sequences as “circular,” in that both displays allow you to scroll “360°” around a sequence. By contrast, range boxes treat all nucleic acid sequences as circular, and all protein sequences as linear.
*Note: SeqNinja will return a red warning icon ( ) if you enter a coordinate greater than the sequence length of a protein, but not of a nucleic acid. If you run a script that shows the warning icon, you will receive an error message with the statement: “[Sequence endpoint is greater than length of a linear sequence.]”

Each feature is displayed as a colorful arrow with the name of the feature displayed above. A rightward-pointing arrow indicates that the feature is on the current strand, while a leftward-pointing arrow signifies that the feature is on the opposite strand.
Light-blue highlighting is used to denote the currently selected range of the sequence.
The following table shows tasks that affect the view or selection:
| Task | How To | Images |
|---|---|---|
| To display or hide the sequence and/or features | Click on the green chevrons to the far right of the range boxes. Hover over each chevron to view a tool tip showing the result that will occur if you click that chevron. |  |
| To view the bases bracketing the current range box coordinate | Consult the shaded wheel just below the range box. |  |
| To view other sections of the sequence without changing the range coordinates | Use the slider under each shaded wheel. Or… Drag the white features area background left or right. |
  |
| To view the range currently visible in the feature display | Consult the ruler under the feature display. |  |
| To display a tooltip with available information about a feature | Use the mouse to hover over the feature. |  |
| To switch the direction of the sequence | Click the green arrow between the two range boxes. |  |
| To cause the sequence direction to match the direction of a particular feature. | Double-click on the feature. Double-clicking a left-facing feature will always flip the sequence direction. |  |
| To zoom in or out on the features | Use the Zoom In and Zoom Out tools to the right of the feature display. |  |
| To change the range coordinates via the range boxes, sequence or features display | Type a new coordinate into one or both range boxes. Or… Drag the shaded wheels under the range boxes left or right. Or… Grab either end of the current (blue-shaded) selection in the features area and drag it to the left or right. |
   |
| To change the range coordinates to match the left or right end coordinates | Type “lend” or “left end” (for left coordinate) or “rend” or “right end” (for right coordinate) into one or both range boxes. Or… Single-click in a range box to activate the Go to left end and Go to right end shortcuts. Then click on the desired shortcut to enter that coordinate in the range box. |
  |
| To change the range coordinates to set the sub-range to match feature coordinates | Double-click on any feature. Note that double-clicking on a feature facing opposite to the direction of the green arrow ( or ) will change the sequence direction. Or… Right-click on any feature and choose Set Range To [feature_name]. |
  |
| To change the range coordinates to set the sub-range to match coordinates across two or more features | Right click on the feature furthest to the left (or right) and select Set Left (or Right) EndPoint to [feature_name]. Then scroll to the feature on the opposite end of the range and choose the opposite right-click command. | 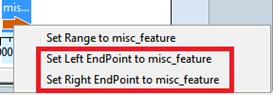 |
Need more help with this?
Contact DNASTAR