The Sanger Validation workflow allows you to co-assemble non-Sanger and Sanger data in SeqMan NGen, and then view the results in SeqMan Pro.
There are two circumstances where you may wish to create this type of hybrid assembly:
•To use Sanger reads to validate variants in non-Sanger (usually Illumina) assemblies.
•To confirm the sequence in a low coverage region of a genome assembly.
Creating the assembly in SeqMan NGen:
1) In the Choose Assembly Workflow screen, select either Whole Genome or Exome and Gene Panel.
2) In the Choose Assembly Type screen, choose Sanger Validation.
3) In the Input Reference Sequences screen, add the reference sequence. Both VCF and Targeted regions file boxes are checked by default but can be unchecked if not needed.
4) In the Input Sequence Files and Define Experiments or Individual Replicates screen, specify the Read technology and paired-end status of the non-Sanger reads. In the upper section, add the non-Sanger reads and then name and group them as usual. In the lower section, add the Sanger reads. Note that multi-sample projects are not allowed in this workflow.

5) Proceed through all other wizard screens and initiate the assembly as you would for any workflow.
Note: If you plan to edit the assembly in SeqMan Pro, you will need to save it in .sqd format. To do this, check the box next to SeqMan Pro Format in the Assembly Output screen of the SeqMan NGen wizard prior to assembly. This format allows you to edit the assembly in SeqMan Pro, but also has several limitations with regard to variant calling and display. For instance, if you open the .sqd file in SeqMan Pro, rather than the .assembly package, SeqMan Pro’s Variant table will not separate NGS and Sanger calls and will show limited statistical information. Also, SeqMan Pro’s Alignment View won’t display the NGS and Sanger reads in separate groups.
Using Sanger data to confirm non-Sanger reads in SeqMan Pro:
1) After the assembly is complete, open the .assembly (preferred) or .sqd file in SeqMan Pro.
2) Use the Alignment View to view the area of interest that you want to validate, typically a variant or small indel. There are several ways to navigate to such an area:
•Within the lower pane of the Project Summary window, double-click on the Sanger read that is expected to cover the variant. This will launch the Alignment View for that read.

•Select a contig in the Project Summary window, open the Variants Summary Report, locate the variant of interest, then double-click on it to see it in the Alignment View.
•Double-click on the contig name in the Project Summary window to open the entire contig in the Alignment View. Then scroll visually to a known position of interest; or use the Edit > Go to Position command to enter a numerical position of interest.
3) Within the Alignment View, click on an expand arrow next to a Sanger .abi read file to open the trace file. If prompted, navigate to the directory where the .abi file is stored.
The Sanger data can now be used to validate the non-Sanger findings.
Note that SeqMan NGen and SeqMan Pro have a specialized procedure for making variant calls for Sanger data. First, traces of all bases in each Sanger read are reanalyzed by the traditional SeqMan variant caller. Potentially heterozygous positions in bulk-sequenced DNA that have acceptable quality scores for peak shape and that fall within the heterozygous peak threshold limit set in Variant Discovery Parameters are recalled and presented using the standard ambiguity codes (e.g. G or A = R, C or T = Y, etc.). For the purposes of read depth, those positions are counted as two reads rather than one. Once all the bases have be reanalyzed, the Bayesian variant caller (specified by checking a Variant detection mode box in the SeqMan NGen’s Assembly Options screen) is used to identify potential variants, as usual.
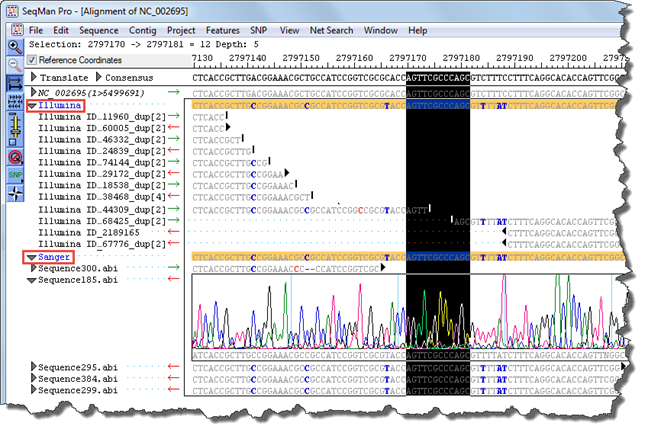
Example: In the image below, there is a gap in the contig that is not covered by the Illumina paired-end data. In addition, blue text denotes the presence of several variants (i.e., locations in which the Illumina consensus does not match the template). The Sanger data corroborates these variants and also allows closure of the gap.
