 ) and
choose the desired project type.
) and
choose the desired project type.The Add Experiments to Import dialog lets you import data files into a new or existing ArrayStar project. It is also the first screen in the Project Setup wizard.
Accessing the dialog:
There are two ways of launching the Add Experiments to Import dialog:
•Use the File > Import Experiments commands.
•From an existing project’s Experiment List tab, click on the Import
Experiments tool () and
choose the desired project type.
If you attempt to launch the dialog from within an existing ArrayStar project, the following warning will appear:
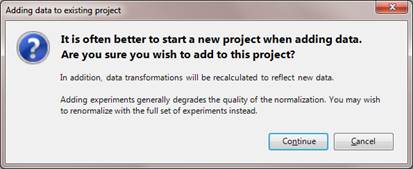
If you still wish to add experiments, press Continue to proceed to the Add Experiments to Import dialog. Available options will vary depending on project type.

To add experiments:
This dialog may offer several ways in which to add data, depending on project type:
•Click the Add File or Add Folder buttons to browse to and select the files you wish to import. You can continue to use these buttons repeatedly to add additional files. Alternatively, you may drag and drop files or folders into the Experiments Ready to Import section.
•Click the Add SeqMan NGen .assembly folder to add an assembly from DNASTAR’s SeqMan NGen application.
Note: To add an .assembly file, choose Add SeqMan NGen .assembly folder or drag and drop the folder onto the Experiments Ready to Import section.
To import files from an existing project, use the Import
from ArrayStar Project button or click the name of an ArrayStar or SeqMan
NGen project from the Recent Files section. Any hidden files in that section can
be unhidden by clicking the arrow at the right ( ).
).
You can force the Data Import Wizard to appear during import by checking the box next to Force custom importing before adding the data files. You may wish to do this if you are importing files that are recognized by ArrayStar but have formatting issues or non-standard data fields that need to be defined, or if the files you are importing are recognized as a format other than what they actually are. For example, some files that begin with “>” may be recognized as FASTA files even though they are actually a different file format.
Note: See Supported File Types for information on the types of files ArrayStar can import.
During the process of loading your files, if ArrayStar detects that additional files are needed, the Locate Missing Files dialog will appear. If ArrayStar does not recognize the file format you are trying to load, the Data Import Wizard will appear to guide you through importing the data.
Adding experiments in the Variants workflow:
If you are working with a Variants project, you may import the following data types:
|
Source |
Extension |
|
SNP data plus basic MID-tag and feature information exported from a SeqMan SNP table. (These data are obtained by first assembling with SeqMan NGen, and then opening the assembly in SeqMan and exporting the SNP report.) |
.txt (specific format) |
|
SNP data plus detailed feature, MID-tag and sample name information exported from SeqMan NGen |
.assembly |
|
SNP text files from third parties (e.g. HapMap) imported via the Data Import Wizard |
|
Using the buttons next to “Experiments Ready to Import”:
Once data are added to the Experiments Ready to Import section, the Remove button is enabled. If necessary, select one or more experiments and use the Remove button to remove unwanted experiment(s) before importing them into the project. Alternatively, you can select the experiment(s), then right-click and choose Remove Selected Experiments.
If you have added sequence data for RNA-Seq, ChIP-Seq or miRNA experiments, you have the option to treat multiple files as a single experiment. To do this, use Ctrl+click or Shift+click to select the experiments you want to merge into a single experiment, and then click the Merge Files button. You will be prompted to enter a name for the merged data. Type in the name you wish to use for the Experiment and click OK.

Alternatively, if the files you want to merge were all imported from the same folder, you may select all the experiments and click Merge by Directory. This will create a single experiment for each folder that contains imported sequence data. ArrayStar will automatically generate experiment names based on the respective folder names.
To restore a merged experiment back to the individual files, highlight the merged experiment and click Unmerge Files.
Changing the data scale:
Once your files have been added, the file name, chip name, and the detected data scale (log2, log10, or linear) will be displayed in a grid:

Note: The Data Scale column will not be present when you are importing QSeq data.
ArrayStar attempts to automatically detect the data scale (log2, log10, or linear) of each imported array. If you know that the data scale shown in the Add Experiments to Import window is incorrect, click the drop-down arrow in the Data Scale column to change it for individual or multiple experiments. In cases where the data scale is certain, as with .cel and .chp files, the ability to change this field is disabled.
When importing data on a linear scale, values that are zero or negative are considered to be invalid. In these cases, ArrayStar will convert these invalid values to the lowest valid value within the dataset.
Note: Once your files have been imported, if you notice that the data appears skewed, or that the linear display of the Scatter Plot displays your data as if it is on a log2 scale, it may be necessary to re-import your data, and change the Data Scale setting.
•Single-click on a row to select a single experiment.
•Shift+click to select a range of experiments.
•Ctrl+click to add an experiment to the existing selection.
•Click on a column header to sort the table by that column.
Click Next to proceed to the Set Up Preprocessing for Microarray Data, Set Up Preprocessing for Variants Data, Set Up Preprocessing for CNV and RNA-Seq Data, or Set Up Preprocessing for ChIP-Seq and miRNA pages. Click Cancel to close the Project Setup Wizard without adding any data to the project.