
The Location tab, located in the Feature Editor, lets you determine what sequence coordinates are associated with a given feature, where the feature appears and how the feature is labeled. The feature can be one contiguous stretch of residues or it can be a series of segments.
To access this tab, open the Feature Editor. This dialog always opens with the Location tab active. For a list of ways to open the Feature Editor dialog, see Annotate Features.
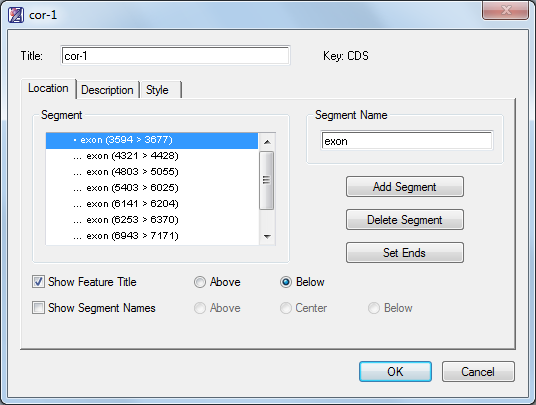
- Use Title to name the feature or edit the current name.
- Segment lists all segments in a feature. Double clicking a segment lets you set its range by selecting the Set Ends button. Selecting a segment makes it active in the Segment Name field.
- The Segment Name field displays the name, if any, of the selected segment in the Segment window to the left. Under segment name, type in a name for the segment (e.g., the name or number of the exon) if desired.
- Click Add Segment to add a new segment after the selected segment if desired. (Note that you may instead find it more convenient to return to the assay document, select the next segment you want to annotate, and then select Sites & Features > Join to Feature.)
- If the last segment in the list is highlighted, the default range begins with the first residue following the last segment and ends at the last residue in the sequence.
- If you have highlighted a segment higher in the list, Add Segment uses the range from the end of the previous segment to the beginning of the succeeding one.
- If the last segment in the list is highlighted, the default range begins with the first residue following the last segment and ends at the last residue in the sequence.
- Click Set Ends to modify the segment end points and to set the range and orientation of the segment.
- Click Delete Segment if you wish to remove the selected segment from the segment window.
To annotate the feature on the bottom strand rather than on the top strand, click the Set Ends button, then click the white button with two arrows on it. If you have chosen the “arrow” style in the Style tab, the arrow will now point in the opposite direction.
- Check the *Show Feature Titl*e box to display the feature title when the feature is displayed on the assay document. After placing a check, click Above or Below to determine the position of the title display. If there is no check mark present, GeneQuest will not display the feature’s title when it displays the feature on the document.
- Check Show Segment Name to show the segment name when the segment is displayed on the assay document. After placing a check, click Above, Center, or Below to determine the position of the name display. If there is no check mark present, GeneQuest will not display the segment’s name when it displays the feature on the document.
After you have set the feature’s location, you may wish to use the Description tab to modify the class of a feature or notes about it, or the Style tab to change its graphic appearance. Or click OK to save changes and close the dialog.
Need more help with this?
Contact DNASTAR