
In this first part of the GenVision Pro tutorial, you will start by downloading and extracting the tutorial data from the DNASTAR website. Next, you will begin a new session and add an E. coli assembly produced by DNASTAR’s SeqMan NGen. You will then create a custom label for the sequence based on the accession number and sequence description.
- Download the tutorial data extract the folder to any suitable location (e.g., your desktop).
- Launch GenVision Pro, which will open at the Welcome screen.
- Drag the newly-extracted project MG1655_genome.assembly and drop it on the GenVision Pro window.
- Click on the Genome tab.

Note that the name of the active sequence is ‘1.’ In the next steps, you will be changing this name to something more useful.
- Right-click on sequence ‘1’ and choose Rename with Fields. This opens the Choose Label dialog.
Note that the Display is set to One or more fields. This setting lets you automate the naming process for any number of selected sequences using fields such as sequence length, organism, or description.
![]()
The left pane shows available fields, and the right pane shows fields that will be displayed as part of the sequence name. Initially, Default name is the only field listed in the right pane.

- Select and organize the fields to display as part of the sequence name:
- Click on the left arrow (
![]() ) to remove Default name from the right-hand pane.
) to remove Default name from the right-hand pane.
- Use Ctrl/Cmd+click to select Accession number and Description from the list on the left. Click the right arrow (
![]() ) to move them to the right-hand pane.
) to move them to the right-hand pane.
- Click on Description on the right to select it. Then use the up or down arrows on the right (
![]()
![]() ) to move Description to the top of the list.
) to move Description to the top of the list.
![]()
- Click OK to save changes and exit from the dialog.
- Click on the left arrow (
 ) to remove Default name from the right-hand pane.
 ) to move them to the right-hand pane.
 ) to move Description to the top of the list.
The sequence name in both the Overview and Analysis view has changed from ‘1’ to:

However, you may only be able to see the first part of the name.
- To see a tooltip displaying the full name, hover your cursor over the visible portion of the name (see area boxed in purple, below).
![]()
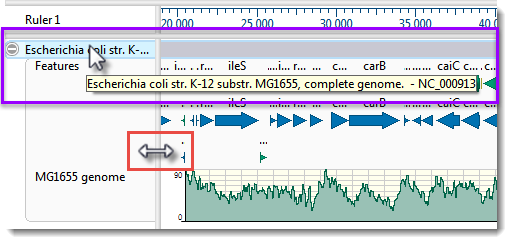
- To view the entire name, drag the pane divider (boxed in red, above) to the right. Then return the pane divider to its original position for ease of viewing the sequence section in the next part of the tutorial.
- To edit the name field manually, right-click on the name and select Rename. This opens the same dialog as before, but Display is now set to Custom label. The current name appears in the Label field. In that field, change “Escherichia” to “E.” and remove the comma and the words “complete genome.” Click OK.
Proceed to Part B: Work with feature tracks.
Need more help with this?
Contact DNASTAR