
The Features view provides a table that allows you to view and manage all of the features within a selected contig. Checking and unchecking features in the view partially determines which features can be seen in the Alignment and Strategy views. (Feature display is also dependent on which tracks are visible).
To access the Features view, choose one or more contigs from the Explorer panel. Then either choose View > Features > (Contig Name) or Features > (Contig Name; or right-click on the selected contig(s) and choose Show Feature Table.

If you select multiple contigs, a separate Features view will open for each of them. If you select “Unlocated Contigs,” individual tables will open for each member of the group. You may wish to avoid selecting “Unlocated Contigs” if you are working with a large number of such contigs, as with many transcriptome or multi-chromosome genome assemblies.
To add, remove, rename or rearrange the data columns in the view, use the Change alignment options in this view ( ) tool in the top right of the header.
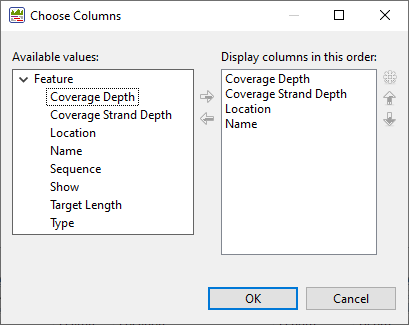
Available columns are on the left, while currently-applied columns are on the right.
- To add a column to the display, select its name on the left and press the right arrow key to move it to the right.
- To remove a column from the display, select its name on the right and press the left arrow key to move it to the left.
- To change the order of displayed columns, select the column name you wish to move on the right, then use the up/down arrows to place it in the desired order.
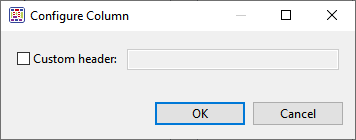
- To create a custom header for a displayed column, select its name on the right, then choose the Configure column tool (
![]() ). In the popup dialog, type in the desired name and press OK.
). In the popup dialog, type in the desired name and press OK.
The following table describes available columns in this view in alphabetical order:
| Column | Description |
|---|---|
| Coverage Depth | The average depth of sequence coverage along the length of the feature. |
| Coverage Strand Depth | (stranded RNA-seq only) The total number of sequenced bases within the feature and on the correct strand, divided by the length of the feature. |
| Location | The sequence range where the feature is located. |
| Name | The name of the feature. The /dnas_title qualifier is used for the feature name. If no /dnas_title is available, SeqMan Ultra will use the value of the first qualifier listed for the name. |
| Sequence | The name of the contig containing the feature. |
| Show | Boxes with/without checkmarks are visible/hidden in the other views. Add or remove check marks by clicking the boxes. |
| Target Length | The length of the feature in bases. |
| Type | Feature type. |
The table below shows tasks that can be done in the Features view:
| Task | How To |
|---|---|
| Choose which features appear in the Features view | Use the drop-down menu on the left of the Features view header to show increasingly specific tables of features: All Features, Genes (only) and the subset of feature types chosen on the Input Reference Sequences page of the SeqMan NGen wizard (e.g. CDSs and ncRNAs only).  |
| Select all features of a specified type | Select a type of feature from the Features view (e.g., a CDS feature) and then use the menu commands Features > Select > Select All Selected (or Select All of Type or Select Only of Type ). |
| Choose which features appear in the Strategy view | To choose which features should be shown or hidden in the Strategy view when Feature tracks are displayed, add or remove checkmarks from the features in the Features view. As a shortcut, you can use the following commands to add or remove checkmarks in groups.
|
| Add, rearrange, rename, or remove table columns | Press the Change options in this view tool ( ) in the top right of the view. |
| Export data from the table | Press the Export data tool (  ) in the top right of the view. This opens a save dialog in which you can save the tabular data in comma-separated (.csv) or tab-separated (.tab) format. ) in the top right of the view. This opens a save dialog in which you can save the tabular data in comma-separated (.csv) or tab-separated (.tab) format. |
| View features for constituent sequences | Display the Features track in the Alignment or Strategy views. If you are unable to see an expected feature, it may have been on part of the sequence that was trimmed as vector. |
| View features on the consensus sequence | Display the Features track in the Strategy view. |
| Simultaneously select a feature in multiple views. | When you select a feature in the Features view, the range of the feature will also be selected in the Alignment view, for features on constituent sequences; or the Strategy view, for features on the consensus sequence. |
Need more help with this?
Contact DNASTAR