
The Variant view provides a table with a row for each variant position. This view is only available for reference-guided assemblies in .assembly format.
To access the Variant view, choose a contig from the Explorer panel. Then either choose View > Variants > (Contig Name) or Variants > Show Variant Table or right-click on the selected contig and choose Show Variant Table. In later versions of SeqMan Ultra, you may be able to choose different versions of the view to display using the drop-down menu on the upper left of the view. Currently only available version is SNPs Summary.
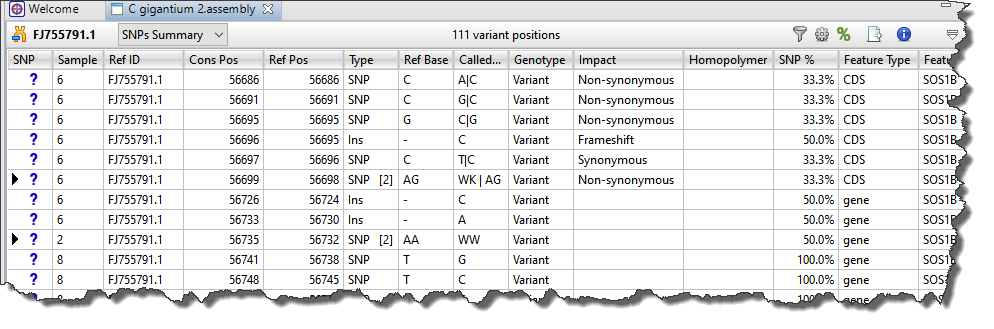
Each row in the SNPs Summary table summarizes information for all of the variant bases in an aligned column. If you are viewing a SeqMan NGen assembly, only variants meeting the SNP filter stringency (High, Medium or Low) that you specified in the SeqMan NGen wizard are displayed.
The table below describes tasks related to the Variants view:
| Task | How To |
|---|---|
| Add, rearrange, rename, or remove data columns | Press the Choose or rearrange columns ( ) tool in the top right of the view. See Choosing and understanding Variants view columns for details. ) tool in the top right of the view. See Choosing and understanding Variants view columns for details. |
| Choose which rows to show/hide | Press the Filter ( ) tool in the top right of the view. See Filtering in the Variants view for details. ) tool in the top right of the view. See Filtering in the Variants view for details. |
| Open the Alignment view at the variant position | Double-click on any row in the table. This is especially useful in situations such as an amplicon assembled against a much longer reference. In this case, the Alignment view may appear virtually empty when viewed on its own. However, double-clicking on a row in this table will open the Alignment view at a populated position. |
| Select a category of variants | Use the commands in the Variants menu to select a large group of variants at once. Regardless of the current selection, you can select Variants > All or Variants > None. If you have already made a selection in the table, the uppermost menu command will allow you to select all variants of the same type (e.g. Variants > Select > Select All of Type ‘CDS’). To select everything that is not currently selected, use Variants > Invert Selection. Alternatively, you can use the right-click menu options of the same names. |
| Change the status of selected variants | The leftmost column of the table (represented by a small triangle in the header) denotes the status of a variant. Initially, all variants are marked as putative.
|
| Hide/show multiple references bases | If there were multiple reference bases at the location of a variant, the leftmost column will feature a small triangle in that row. Click on the triangle to show the multiple reference bases.  In .assembly projects, variants in adjacent columns are coalesced into a single insertion or deletion if they are of the same type, and if at least 80% of the reads with the called variant in one column have a variant in the adjacent column. Each coalesced multiple-base insertion or deletion can be opened to reveal individual variants by clicking the corresponding triangle to the left of the SNP column. After clicking a triangle, information on each position of the insertion/deletion is displayed in a separate row.  |
| Show counts as a percent | Press the Show counts as percent tool (  ) in the top right of the view. This affects columns named Cnt. ) in the top right of the view. This affects columns named Cnt. |
| Export data from the table | Press the Export data tool ( ) in the top right of the view. This opens a save dialog in which you can save the tabular data in comma-separated (.csv) or tab-separated (.tab) format. See Export data from the Variants view for details. ) in the top right of the view. This opens a save dialog in which you can save the tabular data in comma-separated (.csv) or tab-separated (.tab) format. See Export data from the Variants view for details. |
| Toggle between showing/hiding the table header | Use the Show quick details tool ( ) in the top right of the view. An example of the table header appears below boxed in red: ) in the top right of the view. An example of the table header appears below boxed in red:  |
 – Putative (the initial status for all variants in the table)
  – Confirmed
  – Rejected
Need more help with this?
Contact DNASTAR