To access options affecting the Alignment view, click on the Style panel expand bar entitled Alignment, or choose View > Style > Alignment.
![]()
| Task |
How to… |
| Specify the type(s) of editing allowed in an .sqd assembly |
Make a selection from the Editing drop-down menu. Choices are:
- All editing allowed – Allows you to type in new nucleotides or gaps into the consensus sequence, or to delete the same. To add gaps, use dashes (-).
- Only gap editing allowed – Allows you to add gaps using dashes (-) or to remove gap-indicating dashes. Does not allow nucleotide characters to be added or deleted.
- No editing allowed – Disallows adding or removing nucleotides or gaps in the Alignment view. If you choose this option and attempt to edit the consensus, you will receive a warning message asking if you would like to allow editing. If you respond with Yes, the Editing menu will be switched to All editing allowed.
- No editing allowed permanently – This option is similar to No editing allowed. However, the only way to override the option is to manually make a different selection from the Editing menu.
|
| Limit color-coding to the targeted coverage region only |
Check the Color only in targeted coverage regions box to cause coloring options selected elsewhere in this section to only be applied to nucleotides in the targeted region of the assembly. |
| Display quality scores |
To display quality scores as subscripts next to each nucleotide, check the Quality box and then make a selection from the drop-down menu to the right:
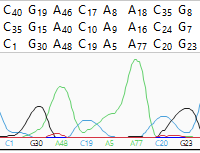
- Show scores – Causes quality scores to be displayed as a subscript next to the base. When bases with very high quality scores (>99% of the 95th percentile) are displayed, two asterisks (**) will be shown in place of the usual numerical subscripts. Example: G52 A84 G** C85.The quality score of a peak is calculated based on the shape and height of each peak and is adjusted relative to the maximum height of any peak in the entire sequence. Taller, sharper peaks receive the highest quality scores. The heights of any underlying peaks are subtracted from the highest peak’s score. Illumina data will typically have higher scores than Sanger data. For .fas files, SeqMan NGen automatically checks for .qual files with the same name in the same folder. If found, the quality values are displayed. Note that gaps are not assigned quality scores.
![]()
- Show averaged scores – Displays quality scores averaged over a defined window. This mode is useful for examining trimming. Note that gaps are not assigned quality scores.
|
| Specify where background and foreground coloring should be applied |
To show where background and/or foreground coloring should be applied, make a selection from the Alignment coloring drop-down menu. This option is only active if at least one of the Color sequence foreground or Color sequence background boxes are checked in the Sequence section described above. Options include: No special coloring, Color only differences from consensus, Color only matches to consensus, Show only differences from consensus, Color matches and differences, and Color only SNPs.
Choosing any of the first four menu options enables the following options.
![]()
To specify the color of sequence characters, use the “foreground color” tools to the right of ![]() . To display the letters in a single solid color of your choice, check the box next to Solid. Then click on the ‘A’ tool to the right of the checkbox and choose a color from the color picker. To instead choose a preset color scheme, check the box next to Scheme and make a selection from the drop-down menu. Color scheme choices are described in Available color schemes. . To display the letters in a single solid color of your choice, check the box next to Solid. Then click on the ‘A’ tool to the right of the checkbox and choose a color from the color picker. To instead choose a preset color scheme, check the box next to Scheme and make a selection from the drop-down menu. Color scheme choices are described in Available color schemes.
To specify the background color (boxes around each letter), use the “background color” tools to the right of ![]() . To use a single solid color of your choice, check the box next to Solid. Then click on the ‘highlighter pen’ tool to the right of the checkbox and choose a color from the color picker. To instead choose a preset color scheme, check the box next to Scheme and make a selection from the drop-down menu. Color scheme choices are described in Available color schemes . To use a single solid color of your choice, check the box next to Solid. Then click on the ‘highlighter pen’ tool to the right of the checkbox and choose a color from the color picker. To instead choose a preset color scheme, check the box next to Scheme and make a selection from the drop-down menu. Color scheme choices are described in Available color schemes
Choosing Color matches and differences enables the following options.
![]()
Check the corresponding font color box (left) or highlight box (right) to enable color choosing. Then click on the “A” and/or Color “highlighter” icons to open their color choosers.
Choosing Color only SNPs enables a different set of options.
![]()
- Not a SNP – A base that did not meet the minimum threshold to be called as a SNP and that does not appear in the Variants view. Default color is gray (
![]() ). ).
- Putative SNP – A base that met or surpassed the minimum SNP calling threshold, and therefore contains a question mark in the Variants view SNP column. Default color is blue (
![]() ). If you apply a more stringent filter in the Variants view, this base will change to “red strikethrough” coloration. ). If you apply a more stringent filter in the Variants view, this base will change to “red strikethrough” coloration.
- Confirmed SNP – A called SNP that was manually validated and therefore has a checkmark in the Variants view SNP column. Default color is green
![]() . .
- Rejected SNP – A base that was called as a SNP during assembly in SeqMan NGen, but which was was manually rejected and therefore has a red ‘x’ in the Variants view SNP column. Default color is red (
![]() ). ).
The same red color is used by default to indicate a mismatched base that was filtered at the time of assembly using SeqMan NGen and thus never appeared in the Variants view. In most cases, the mismatched base is not a SNP, but a base-calling error; the background “noise” contained by all sequencing data. If you believe this base to be a SNP, you cannot undo this filter in SeqMan Ultra. Instead, you would need to rerun the assembly with the variant caller set to a more relaxed stringency setting.
- Filtered SNP – A base that was initially called as a SNP but was filtered out by setting more stringent filtering criteria in the Variants view. Default color is red strikethrough (
![]() ). Relaxing the filtering criteria can cause the base to revert back to the blue coloring of a putative SNP. ). Relaxing the filtering criteria can cause the base to revert back to the blue coloring of a putative SNP.
|
| Display negated weights or trimmed sequence with a custom font color or highlighter |
Check the corresponding font color box (left) or highlight box (right) to enable color choosing. Then click on the “A” and/or Color “highlighter” icons to open their color choosers. |


 . To display the letters in a single solid color of your choice, check the box next to Solid. Then click on the ‘A’ tool to the right of the checkbox and choose a color from the color picker. To instead choose a preset color scheme, check the box next to Scheme and make a selection from the drop-down menu. Color scheme choices are described in Available color schemes.
  . To use a single solid color of your choice, check the box next to Solid. Then click on the ‘highlighter pen’ tool to the right of the checkbox and choose a color from the color picker. To instead choose a preset color scheme, check the box next to Scheme and make a selection from the drop-down menu. Color scheme choices are described in Available color schemes

 ).
).  ). If you apply a
  .
.  ).
).  ). Relaxing the filtering criteria can cause the base to revert back to the blue coloring of a putative