
The Unassembled view is where you assemble Sanger data directly in SeqMan Ultra; all other data types are assembled using SeqMan NGen. This view lets you load Sanger sample and reference sequences, trim samples based on trace quality or the presence of vector, set assembly parameters and perform the assembly itself.
To launch the Unassembled view from the Welcome window’s New Assembly tab, click either of the Molecular biology options; both options launch Sanger assembly workflows, which are assembled in SeqMan Ultra itself. This causes the Unassembled view to open as the sole view on display. At any other time, you can open the view by clicking on the Unassembled view tab or by using the View > Unassembled > Show command.
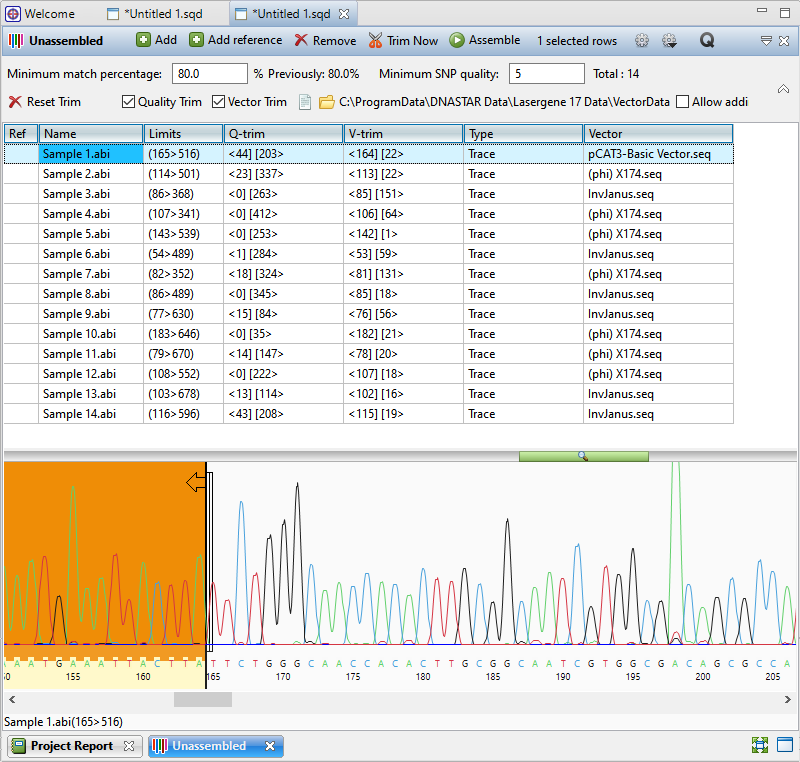
The view consists of four sections: a blue toolbar, a light gray header, an upper section containing a table, and a lower section that displays trace chromatogram data, if available. The toolbar and header are described in the “how to” table near the bottom of this topic. The upper & lower sections are described separately, below.
Sequence table (upper section):
The top of the Unassembled view consists of a table that is empty until you add sample and/or reference sequences (see the lowermost table in this topic). Once populated, the columns show the following information:
| Column Name | Description |
|---|---|
| Ref | If a sequence was loaded using the Add reference tool (see table below), a black check mark will appear to denote that the row contains a reference sequence. |
| Name | The name of the sequence. |
| Limits | Displays the coordinates remaining after vector trimming, quality trimming, and/or manual trimming. This is the portion of the sequence that will be used during assembly. |
| Q-trim | After automatically trimming sequences based on trace data quality, this column shows sequence coordinates that will be omitted from the 5’ and 3’ ends assembly. |
| V-trim | After automatically searching for vector sequence, this column shows the coordinates that will be omitted from the assembly due to it being putative vector sequence. |
| Type | Displays the word Trace if the sequence contains trace data. Trace data from Sanger/ABI files are imported and saved in the project along with the sequences themselves. |
| Vector | After automatically searching for vector sequence, this column shows the name of any vector discovered in a sample. |
Chromatogram previewer (lower section):
The lower portion of the view consists of a chromatogram previewer with a sequence ruler. The previewer is blank until you double-click a row in the upper section that includes trace data, as shown by the Type menu displaying the word Trace. Once a trace chromatogram is displayed, any sequence that was removed due to poor quality has a pale yellow background. Trimmed vector sequence is shown with an orange background. You can slide the manual trim bars on the 5’ and 3’ ends to manually specify the portion of the sequence that should be removed prior to assembly. Manual selection overrides automatic vector and/or quality trimming.
The Show quality scores tool ( ) on the right of the header can be used to show or hide different types of quality scores. These scores may assist you in deciding where you would like to manually trim the sequence.
Tasks in the Unassembled view:
Note that the table below shows the tasks without context, and in no particular order. To see how to use these tools and buttons to create a new Sanger assembly, see Assemble Sequences.
| Task | How To |
|---|---|
| Upload sample and reference sequences | To upload sample sequences and their trace data (if available), press the Add button ( ). To upload reference sequences (optional), press the Add reference button ( ). To upload reference sequences (optional), press the Add reference button ( ). In both cases, select the desired files and press Open. Note the files added using the Add reference button will appear in the table with a checkmark in the Ref column. Sample files that contain trace data will show the word Trace in the Type column. ). In both cases, select the desired files and press Open. Note the files added using the Add reference button will appear in the table with a checkmark in the Ref column. Sample files that contain trace data will show the word Trace in the Type column. 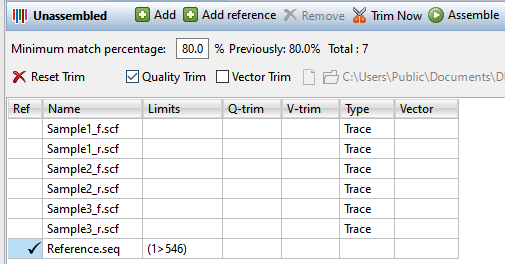 Note: If you try to add large files or non-Sanger sequences, you will receive a message notifying you that SeqMan NGen must be used for the assembly.  Press OK to launch SeqMan NGen at the Input Sequences wizard screen. |
| Remove sequence rows from the table | Select one or more rows and either choose Edit > Remove Sequence or press the Remove tool ( ). ). |
| See how many rows are currently selected | This is displayed in the middle of the blue header between the two groups of tools:  . . |
| View trace data for a sample | Double-click on the sample row. This populates the lower portion of the Unassembled view with a trace data chromatogram. 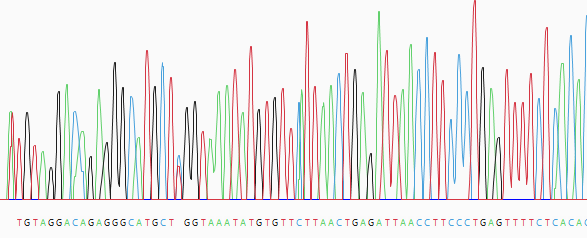 |
| Manually trim sequence ends | Open trace data for a sample by double-clicking its row in the upper table. The chromatogram appears below. Grab the vertical sliders on the 5’ and/or 3’ ends of the sequence and release them in the desired location. The portion of the sequence that will be removed is shown with a yellow background. The coordinates that will be omitted from the assembly are shown in the bottom left corner of the Unassembled view, as well as in the Limits column of the table above. 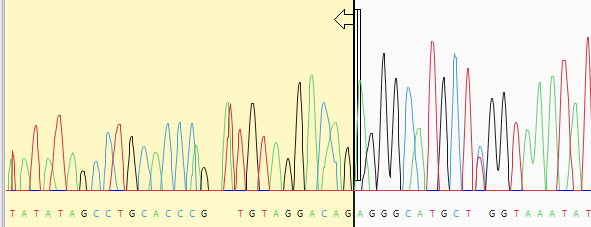 |
| Automatically trim sequence ends based on quality | Check the Quality Trim box and press the Trim now tool ( ). (If the box is not visible, press the ). (If the box is not visible, press the  tool on the top right). This method uses SeqMan Ultra’s proprietary quality score system to remove low-quality data. The coordinates that will be omitted from the assembly are shown in the Q-trim column of the table above. tool on the top right). This method uses SeqMan Ultra’s proprietary quality score system to remove low-quality data. The coordinates that will be omitted from the assembly are shown in the Q-trim column of the table above. |
| Restore all trimmed sequence | Press the Reset Trim tool ( ). (If the tool is not visible, press the tool on the top right). ). (If the tool is not visible, press the tool on the top right). |
| Automatically remove vector sequence | Check the Vector Trim box. (If the box is not visible, press the tool on the top right). By default, SeqMan Ultra will remove vector sequence from any of the vectors in the VectorData catalog installed with Lasergene. If desired, you can override this by using the tools to the right of the checkbox. Press Choose a vector from a file to navigate to a specific vector sequence file or Choose a folder containing vectors to specify a folder of vectors. Then press the Trim now tool (). If vector sequence was found and removed, the vector name will be listed in the table’s Vector column. The coordinates that will be omitted from the assembly are shown in the V-trim column. |
| Specify the assembly stringency | Enter a number in the box to the right of Minimum match percentage in the header. (If the box is not visible, press the tool on the top right). To the right of the box, the header displays the number used the previous time this set was assembled (if an assembly has already taken place) and the number of sample and reference sequences involved in the assembly. If some samples are not being aligned, try changing the Minimum match percentage prior to assembling again.  |
| Assemble the sequences | After performing the desired vector or quality trimming, if any, press the Assemble tool ( ) to assemble all the sample sequences in the table. If a reference is present, the assembler will use the reference(s) as a template. Otherwise, the sequences will be de novo assembled. ) to assemble all the sample sequences in the table. If a reference is present, the assembler will use the reference(s) as a template. Otherwise, the sequences will be de novo assembled. |
| Open a dialog for customizing assembly parameters | Use the Assembly parameters tool ( ) or the command Project > Project Parameters. See Assembly parameters for information about each of the options. ) or the command Project > Project Parameters. See Assembly parameters for information about each of the options. |
| Display/hide the Minimum match percentage and trimming options in the header | use the Show quick trimming and assembly options tool (). |
| Display/hide quality scores in the chromatogram previewer | Press the Show quality scores tool ( ) and choose from Don’t show scores, Show scores and Show averaged scores. For more information, see Quality score calculations. ) and choose from Don’t show scores, Show scores and Show averaged scores. For more information, see Quality score calculations. |
| Allow or disallow the formation of single-sequence contigs | To allow formation of single-sequence contigs, check the box Allow adding single sequence contigs. To prevent single-sequence contigs, leave the box unchecked. |
Need more help with this?
Contact DNASTAR