
- Data for all SeqNinja tutorials is located in the same .zip archive. Click here to download the SeqNinja tutorial data and extract the .zip archive to any convenient location (e.g., your desktop).
- Launch SeqNinja if it is not already open.
- From the main window or Templates panel, choose Blank Script.
- Open the Toolkit panel and click Write to Results File (in the Sequences area) to add it to the Visual View.
- Since the sequence source is a file, click the File button. Press the Choose Sequence(s) button and double-click on the tutorial data file LAMCG.seq to select it as the source sequence.
- In order to add a step for setting the ends of the sequence, do any of the following:
- Right-click in the blue “Sequence file” area of the existing step and choose Add Sub-Range.
- Click on the plus icon (
![]() ) to the right of the Choose Sequences row and select Add Sub-Range.
) to the right of the Choose Sequences row and select Add Sub-Range.
- Return to the Toolkit panel and click Add Sub-Range from the Sequences section.
- Right-click in the blue “Sequence file” area of the existing step and choose Add Sub-Range.
 ) to the right of the Choose Sequences row and select Add Sub-Range.
 The script now appears as follows:
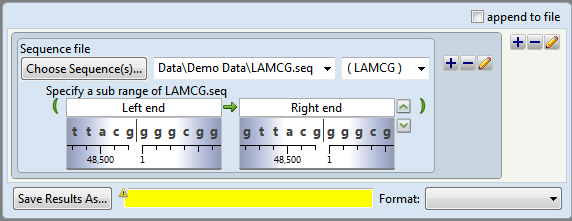
Two shaded “wheels” appear under the range boxes showing the sequence surrounding each coordinate. Note the similarities between the sub-range boxes and the double set of range boxes in Tutorial 1: Inserting Bases into an Existing Sequence.
- The int gene occupies a range from 27812 to 28882 bp. To scroll to the gene, type over the words Left end with 27812 and the words Right end with 28882. Observe that the nucleotides and ruler under the text boxes change to reflect the new positions.
- To view the sequence annotations for this region, click the downward-pointing green arrow on the right (
![]() ). The int gene graphic, which appears as two large arrows, verifies that the end coordinates do indeed bracket the correct gene.
). The int gene graphic, which appears as two large arrows, verifies that the end coordinates do indeed bracket the correct gene.
 ). The int gene graphic, which appears as two large arrows, verifies that the end coordinates do indeed bracket the correct gene.
Proceed to Part B: Adding the reverse complement step.
Need more help with this?
Contact DNASTAR