
If your project is in .sqd format, you can edit and delete contigs; and create, edit and remove contig scaffolds as shown in the table below. Note that most of the following tasks require you to first select one or more contigs or scaffolds in the Explorer panel.
| Task | How To |
|---|---|
| Delete a contig | Select the contig in the Explorer panel, then use Contig > Delete Contig. |
| Place contigs on a scaffold | A “contig scaffold” is a collection of contigs that are related based on their known spatial relationships rather than their sequence similarity. SeqMan NGen uses paired end sequence data to put contigs into scaffolds. If you have independent evidence that two or more contigs are related, you may wish to scaffold the contigs manually. In the Explorer panel, use Shift+click or Ctrl/Cmd+click to select the contigs you wish to place together on a scaffold. Next, select Contig > New Scaffold or right-click on a contig and choose New Scaffold. The contigs are now placed together in a scaffold at the bottom of the table. 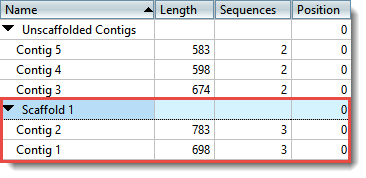 Once at least one scaffold has been created, all other contigs are placed in the Unscaffolded Contigs scaffold. All positions in the Unscaffolded Contigs scaffold are initially set to 0. Note that the order of contigs in the Unscaffolded Contigs scaffold does not imply that adjacent contigs should be joined. |
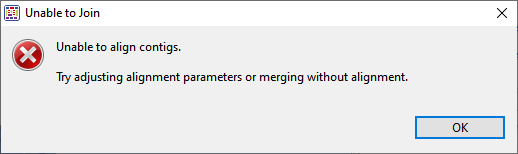
| Order contigs in a scaffold automatically | In the Explorer panel, select the contigs using Shift+click or Ctrl/Cmd+click. Contigs must already be in the same scaffold. Next, choose Contig > Order Contigs or right-click on the selection and choose Order Contigs. A warning appears.  To continue with contig ordering, press OK. SeqMan Ultra will evaluate or reevaluate all contigs, including those already in scaffold.Note that changing the Position of a contig can influence whether pairs in different contigs are consistent. |
| Order contigs in a scaffold manually | Contigs in a scaffold can be manually ordered to reflect known spatial arrangements between pairs. In the Explorer panel, edit the Position cell for each contig in the scaffold by clicking on it and typing in an integer representing the order in which the contig should be placed. To view the contigs in order, click once or twice on the Position header.Note that changing the Position of a contig can influence whether pairs in different contigs are consistent. |
| Reverse complement contigs | Select the contig(s) in the Explorer panel, then choose Contig > Reverse Complement (Contig Name). |
| Split a contig | To split a contig manually into two separate contigs at a specified location, select the contig in the Explorer panel. Use the toolbar on the right to open the Alignment view, then place the cursor in the consensus at the position where you wish to split the contig. Finally, select Contig > Split at Insertion. Reads that begin to the left of the insertion point remain in the same contig; reads that begin to the right will be assigned to a new contig. The name of the new contig will consist of the original contig name with %d appended to it. The contig position of the newly created contig is set to the position of the original contig plus the offset of the split location. |
| Place unlocated contigs based on paired-end information | Select the contigs in the Explorer panel, then use Contig > Place Unlocated Contigs. SeqMan Ultra will use paired end information to place contigs from the unscaffolded contigs pool into a scaffold based on consistent pairs. In contrast to the Contigs > Order contigs command, SeqMan Ultra will only attempt to place contigs from the unscaffolded pool. |
| Join two or more adjacent contigs | Select the contigs in the Explorer panel, then use Contig > Align contigs end-to-end. This option is useful when you know the relative order of the contigs, as it prevents mis-joining of distant contigs that happen to have the same sequences at the contig ends. Realigning contigs is faster than reassembling them, as realigning only considers ~1 kilobase at the end of each contig. |
| Replace a portion of the consensus sequence with a portion of a constituent sequence | In the Alignment view, highlight the region of the constituent sequence you wish to use. Select Contig > Force Consensus. After using this command, the selected bases from the constituent sequence will appear underlined. To revert to the original consensus, select the underlined range and use Contig > Compute Consensus. It is not necessary to be exact, as long as all the forced bases you want to undo are included in the highlighted area. Once you use this command, underlining will be removed. |
| Merge two contigs | The Force Join dialog allows you to force merge two contigs into a single contig either manually or semi-automatically. If, for example, two contigs overlap by only 1 bp, they cannot be aligned using any alignment algorithm. You could use this interface to specify the 1 bp overlap and then force two contigs to merge. Conversely, If the overlap is 12 or more bp you can use this interface to align the ends semi-automatically. 
|
| Restore the trimmed end(s) of a contig automatically | SeqMan Ultra can automatically restore up to 100 bases of the trimmed ends of sequences located at the beginning and ends of the selected contigs. The sequence will not be extended past any vector trim sites. Restoring trimmed ends allows you to evaluate whether some of the lower-quality trimmed data may provide evidence that two contigs may be joined. To restore ends automatically, select the contig in the Explorer panel, then choose Contig > Extend Contig Ends > (Subcommand). Choose between: Extend 3’ Sequences ends, Extend 3’ and 5’ Sequences ends and Extend and Align 3’ and 5’ Sequences ends. In each case, SeqMan Ultra will extend the entire trimmed region. Depending on how much was previously trimmed, the effect can be minimal or it can expose many new bases to include in the alignment. |
| Restore the trimmed end(s) of a contig manually | Select a contig in the Explorer panel and open it in the Alignment view. Scroll to the 3’ or 5’ end of the sequence. Click the plus sign next to the sequence name to show the Traces data track. Grab the small dark gray box to the left/right of the final base and drag your mouse to the side to reveal trimmed data. |
Need more help with this?
Contact DNASTAR