
In this tutorial, you will use SeqMan NGen to de novo assemble an E. coli K12 MG155 data set composed of Illumina MiSeq (2×300) paired end reads.
The default stringency setting is designed to produce longer contigs; however, some may contain false joins. You’ll learn how to manually examine contigs for false joins and split them into two contigs. Finally, you’ll realign all the contigs, including the newly split ones, using SeqMan Ultra.
Assembling the data in SeqMan NGen:
- Download T2_Whole_Genome_MatePair.zip (231 MB) and extract it to any convenient location (e.g., your computer’s desktop). The folder contains the following paired end reads:
Ecoli_S1_L001_R1_001.fastq
Ecoli_S1_L001_R2_001.fastq
- Launch SeqMan Ultra and choose New Assembly on the left. On the right, click on the Genomics workflow named De novo genome assembly and editing. This causes SeqMan NGen to open at the Workflow screen.
- On the right of the screen, under NGS-Based, click the workflow named De novo assembly.
- In the Input Sequences screen, press the Add button to add the two paired reads whose names begin with Ecoli_S1_L001_R. Then click Next.
- In the Preassembly Options screen, change the Maximum total reads to 800000 (8 followed by five zeros). Click Next.
- In the Assembly Options dialog, type in an Estimated genome length of 4600000 (46 followed by five zeros). Click Next.
- In the Assembly Output screen, type “De novo mate pair” into the Project Name text box. This name will be assigned to all output files, including the finished assembly. Use the Browse button to specify a Project Folder for your assembly output files. For local users, an alternative way to select a location is to drag and drop a folder from the file explorer onto the Project folder row. The folder you choose must be in a writable location. Then click Next.
- In the Run Assembly Project screen, press Run assembly on this computer.
- Wait until being informed that assembly has finished (approx. 1 hour), then click Next.
- From the Assembly Summary screen, click Open assembly to launch the results in SeqMan Ultra.
- Close the SeqMan NGen project by clicking the Finish button and confirming Yes.
Correcting misjoined contigs and realigning data in SeqMan Ultra:
After following the steps above, your .sqd assembly file is now open in SeqMan Ultra. If analyzing your own data in real life, you would keep the current file open and proceed with the analysis. For purposes of this tutorial, however, you’ll close this assembly and open a similar one that is included in your tutorial data. Why? No two assemblies will be completely identical, due to randomization of the order in which contigs are created by the assembler. Because this tutorial will refer to specific contigs, it will be easier to follow along if you are using a pre-made assembly. Therefore, you will close the current assembly in the first step, below.
- Use File > Close Editor to close the current file, De novo mate pair.sqd.
- Open the pre-made assembly by using File > Open to open the demo data file Sample de novo mate pair.sqd.
- Observe the information in the Project Overview on your screen. Briefly note the high Contig N50 value of 149 kb. This means that half of the genome sequence is located in contigs equal to or longer than 149 kb.
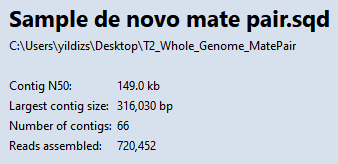
Using a high stringency in SeqMan NGen would likely have resulted in about ten times as many contigs. However, a tradeoff is that some contigs might have been joined when they should not have been. You will address that issue in the next few steps. In “real life,” you would check all of the contigs for false joins (or at least the contigs longer than 100k) and split them where needed. For purposes of this tutorial, you will only examine two contigs: 31 and 38.
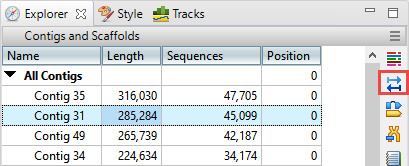
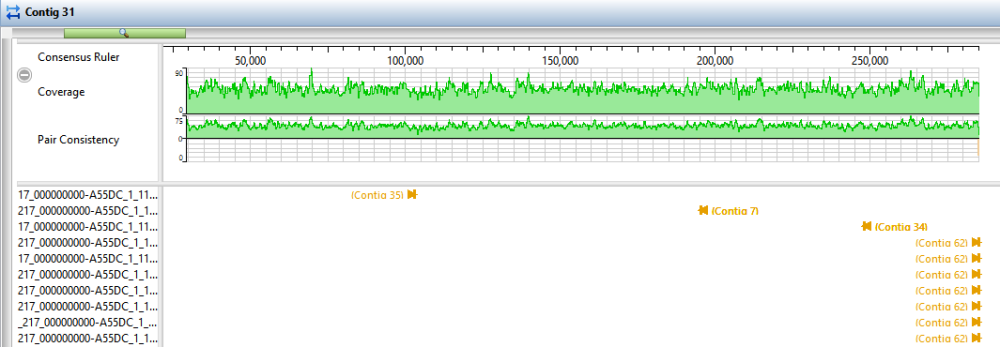
- In the Explorer panel on the right, select Contig 31, which is one of the longer contigs in the project. Then press the Show strategy view tool.
- You will be looking for locations along the contig that are flagged for inconsistent pairs. To easily see inconsistent pairs, click the Style tab on the right. In the Strategy section, uncheck all boxes except Inconsistent (multi-contig).

- In the Strategy view on the left, slide the green horizontal zoom slider to the left so the entire contig is visible. Note that the Pair Consistency histogram near the top does not show any areas of orange, meaning that there are no areas of inconsistency. Looking at the orange arrows at the bottom, ignore the ones at the right edge; these indicate that Contig 31 is likely adjacent to Contig 62. Instead, look for orange arrows that are not on the edges. In this case, there are only three orange arrows that represent possible inconsistent pairs. The very small number indicates that these three are likely artifacts. Contig 31 thus exemplifies a correctly-built contig without false joins.
- Click the Explorer tab and select Contig 38. Click the Show strategy view tool, then click the Show Alignment view tool just above it.
- In the Strategy view (upper view), slide the green horizontal “zoom slider” all the way to the left so you can see the entire sequence. In the Alignment view (lower view), slide the zoom slider all the way to the right for a detailed view.
- In the Strategy view (upper view), look at the area around 42,000. Both the Pair Consistency histogram and the large number of arrows denote that this is a likely misjoin. The arrows facing left have pairs in Contig 47, while the arrows facing right have pairs in Contig 55. Contig 38 represents a contig with at least one false join. (There is another candidate at the very left of the contig).
- Near the upper right corner of the Alignment view (lower view), click the Search alignment tool (
![]() ). On the left, use the Find menu to select Go to Consensus Position. Then type 42260 into the search bar and press either green arrow to navigate to the position.
). On the left, use the Find menu to select Go to Consensus Position. Then type 42260 into the search bar and press either green arrow to navigate to the position.
 ). On the left, use the Find menu to select Go to Consensus Position. Then type 42260 into the search bar and press either green arrow to navigate to the position.
- The position 42,260 is now selected, but the cursor needs to be between two nucleotides. In the Alignment view, click just to the right or left of 42,260 to remove the selection
- Choose Contig > Split At Insertion. A new contig is added to the Explorer panel. The new contig is the only one in the table with a Position other than zero.
In a real-world project, we recommend going through each contig as above. For this tutorial, however, splitting Contig 38 is sufficient. In the next steps, you will create contig scaffolds.
- In the Explorer panel, select the uppermost row, All Contigs. Right-click on the selection, choose Order Contigs into Scaffolds and press OK. SeqMan Ultra creates 23 scaffolds numbered 100 to 230.
- Select the Scaffold 100 row. Choose Contig > Align Contigs End to End and press OK. Repeat for all other Scaffold rows. Most scaffolds will collapse into 1-2 contigs. Some scaffolds (e.g., Scaffold 170) will not collapse at all, and will give a message to that effect. In these case, simply move on to the next scaffold on the list.
- One at a time, drag each contig that remains in a scaffold and drop it anywhere above Scaffold 100. Then use Shift+click to select all of the now empty scaffolds and press the Delete key on your keyboard.
- Choose Project > Project Overview and observe how the steps above have improved the assembly, even though you only split one false join.
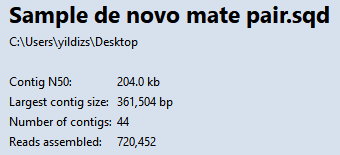
Note that the Contig N50 has increased from 149kb to 204kb, meaning the typical contig is now almost 37% longer than before. The longest contig is over 361,000 bp in length. The number of contigs decreased from 66 to 44. Splitting off additional false joins between Steps 8-9 would likely have improved the assembly even more.
This marks the end of this tutorial.
Need more help with this?
Contact DNASTAR