
In the Overview, look for the longest segment and the longest gap region (shown in gray) in each sequence. Note that both of these are located on the left for "Rat," and on the right for all the other groups. These clues indicate that the segments for "Rat" were likely added in the wrong order. (As you recall, these were deliberately added these in the wrong order in Part A.)
In this part of the tutorial, you will remove the "Rat" group and add it again--this time in the proper order. You will then re-align the sequences.
- Single-click on the name "Rat" to select it.
- Right-click on "Rat" and choose Remove Sequence. When asked to confirm, click OK.
- Click the black triangle to the right of the Add Sequences to Project tool and select the Add sequences end-to-end in project tool (
![]() ).
).
 ).
).- Click the Add button and add the rat sequences again. This time, leave the sequences in ascending order (exon1, exon2, exon3, exon4).
- Change the default Group name to Rat, and uncheck the Add another box. Click OK.
Observe that the Rat sequence has been added to a new area of the view called “Unaligned Sequences.” Click on the expand arrows to reveal the sequence, shown in the image below.

- To perform the MUSCLE alignment with the "Rat" group in the correct order, select the name “Rat” on the left of the Overview and choose Align > Realign with Selected Unaligned. This command tells MegAlign Pro to perform a novel alignment that includes all the sequences in the existing alignment plus the selected unaligned sequences.
- Leave the settings at their default values, and choose Align. As before, the alignment will likely take several minutes to complete.
Once the alignment has finished, note that the gap regions in the Overview now appear more randomly distributed, and that all six organisms now have the longest block on the right.
- Click on the Tree tab at the bottom of the MegAlign Pro window to display the Tree view. Choose the Neighbor Joining:BIONJ method. In the popup dialog, keep the default values and click OK. The tree appears, graphically illustrating plausible evolutionary relationships for the seven species.
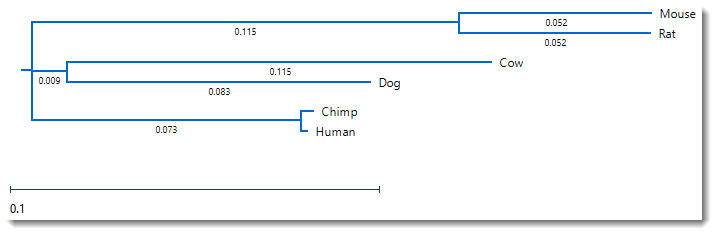
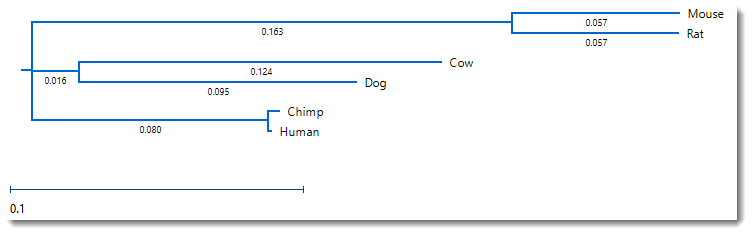
- Change the distance metric by choosing Distance > Parameters. Note that the original Metric was Uncorrected Pairwise Distance. Change the selection to Tamura-Nei (1993) and press OK.
Unlike the Try it! – Perform a Clustal Omega alignment tutorial, where changing the method caused a visible change in the tree organization, the tree retains the original structure, and has only slight changes in the branch length.
- Save the project using File > Save, or by clicking on the Save tool (
![]() ).
).
 ).
).This is the end of the MUSCLE alignment tutorial.
Need more help with this?
Contact DNASTAR