
GenVision Pro’s navigation tools are located just to the right of the button tools and consist of a “sequence selector” (the drop-down menu), a text box, a Go button, and two green arrows. By default, (Genome) is shown in the sequence selector, causing the entire genome to be displayed in the Genome view. The Analysis view and Overview remain empty until a different selection is made.
To move the cursor to a particular position or range using the search bar at the top of the GenVision Pro window:
Use the search bar in the header of the GenVision Pro window, just to the left of a round “Go” button.
See the table below for syntax examples, and the contexts in which they may be used. If you are currently displaying all chromosomes (see above), you may limit the search to a particular one by including it in the query syntax. GenVision Pro will automatically update the drop-down menu to correspond to the chromosome specified by the query.
| Context | Type… | To go to… |
|---|---|---|
| All contexts | chr1: | chromosome 1 |
| 3: | chromosome 3 | |
| chr1:42 | position 42 on chromosome 1 | |
| chr2:300-433 | range 300-433 on chromosome 2 | |
| When viewing a chromosome | 451 | position 451 of current chromosome |
| 23-4343 | range 23-4343 of the current chromosome | |
| When viewing a genome | 3 | chromosome or contig 3 |
If you forget how to enter a query, hover over the sequence selector or text box to reveal a list of sample queries.

A variety of separators (e.g., spaces, < or > symbols) are accepted between the endpoints in a range. For example, all of the following are accepted: 300-433, 300 433, 300..433, 300>43 and 433<300. You can also paste in a range obtained from a variety of external sources, including SeqNinja and the National Center for Biotechnology Information (NCBI).
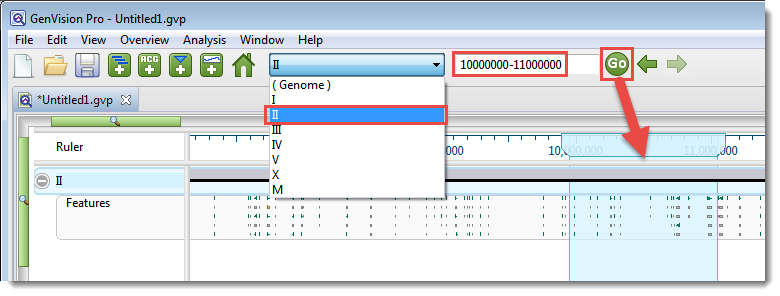
Example: The following image shows an example where both the sequence selector and the text box were used to perform a search.
After pressing the Go button, the location will automatically be saved to the Recent section of the Places panel. This section is similar to the “recent items” cache in other computing contexts, and allows you to return to the same location in the future.
To move the cursor to a particular position or range using a menu command:
Choose Edit > Go to Place to open up a popup dialog with a similar search bar.

In the popup dialog, type a position or range into the text box (refer to the section above for details) and press OK.
To move the cursor to a particular feature:
Type the feature name into the text box. As you begin typing, possible matches will appear in a list below. To pick one of them, use the up/down arrow keys or the mouse. Press the return key or Go to gene or location specified button ( ) to go to the selected item. You can also go to an item by double-clicking on it in the list.

After pressing the Go button, the location will automatically be saved to the Recent section of the Places panel. This section is similar to the “recent items” cache in other computing contexts, and allows you to return to the same location in the future.
To go back to the last recent place:
Click the left arrow ( ). The arrow is only enabled if another location was visited prior to the current location. Note that more recently-visited places are higher up on the list.
To go forward to the next recent place:
Click on the right arrow ( ). The arrow is only enabled if you returned to this location after first visiting another location.
Need more help with this?
Contact DNASTAR