
To export one or more sequences in the Project window to individual sequence files:
To do this, you must have already imported one or more sequences to the Project window.
- Select one or more sequences from the Project tab.
- Choose File > Export Sequence(s) From Project or right-click on the selection and choose Export.
- Choose a format and location for saving the exported sequence(s).
- If you selected a single sequence, the sequence name is used as the default file name. If you selected multiple sequences, the project name is used instead.
- Available file formats may include: .sbd, .seq, .gbk, .embl, and .fas. For formats that do not support multiple sequences, each sequence is saved as a separate file.
- If you selected a single sequence, the sequence name is used as the default file name. If you selected multiple sequences, the project name is used instead.
Synchronous updating allows you to work on the same file in multiple Lasergene applications at the same time, and is available in SeqBuilder Pro and GeneQuest, and—on a limited basis—in Protean 3D. Changes made to a sequence in one application are automatically applied in the other shared applications.
To export one or more sequences to a single sequence file:
See Export sequences into a single file.
To export a sequence to another Lasergene application with synchronous updating:
- Open the sequence of interest.
- Send the sequence to 1-3 additional applications using File > Send Sequence To > [Lasergene application]. For example, you could open the same document in:
- SeqBuilder Pro – to edit the sequence
- GeneQuest – to further analyze a region of conservation
- SeqBuilder Pro – to edit the sequence
For information about how File > Save and File > Save As affect synchronous updating, see Save.
Note that Protean 3D does not allow the editing of sequences or features, and synchronous updating is not supported for .pdb files. As a result, Protean 3D has limited, unidirectional synchronous updating capacity compared to some other Lasergene applications. Changes made in another application may be synchronized to Protean 3D, but not the reverse, as in these two scenarios:
- A file is open in another Lasergene application and you have made unsaved changes to it (e.g., trimming, adding a feature). When you initially open the same file in Protean 3D, any changes made to the original sequence or its features will also appear there.
- The same file is already open in both Protean 3D and another application. You make changes to the file in the other application. Only feature edits will synchronize to Protean 3D; sequence edits are ignored.
To export one or more sequences to GenVision:
- Either make a selection in the Linear, Circular, or Sequence views, or select a sequence in the Project window.
- Choose File > Export as GenVision Project and click the Begin Processing button.
The Export to GenVision dialog compares the features lists for all of the sequences you selected in the Project window in order to find features with the same name that occur in more than one sequence. Once the process is complete, a message will be displayed giving the number of features SeqBuilder Pro identified that occur in more than one of the selected sequences. The table at the bottom of the window lists the number of matches for each feature type, and how many sequences contain a matched feature of the given type.
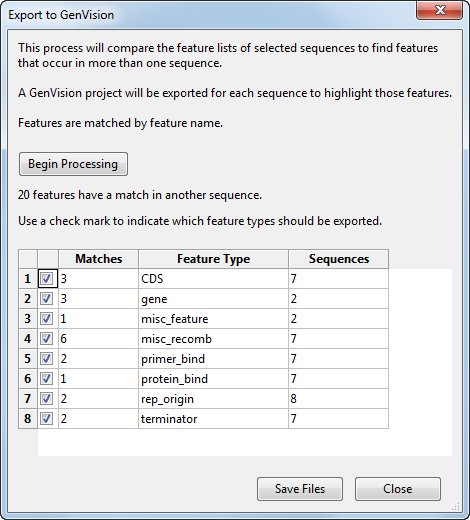
- (optional) To exclude certain feature types from the export, remove the check mark from the row beside that feature type. If a feature type has 100 or more matches, it will be un-selected by default.
- Click the Save Files button.
One GenVision project (.gnv) will be created for each of the selected sequences, and will display the features from one sequence connecting to the same features in all of the other sequences where it occurs. A .txt file will also be created for each exported panel. A new folder containing the exported text files will be created within the same directory as your GenVision project and will be named the same as your GenVision project with a .data extension.
Considerations when exporting sequences from the Project window:
- The use of color in the resulting GenVision project differs based on whether one feature type or multiple feature types were exported. For a single type, each matching set of features will have its own color. When multiple types are exported, each feature type will have its own color.
- Two text panels are created for the feature names. One panel displays the feature names as radial text around the outside of the circular image and the other panel displays the feature names in an arc inside the circular image. By default, only the radially displayed text panel is displayed. However, you may display the other text panel if you wish by adjusting its priority within its data file.
- In the exported image, features are sorted so that feature types that have the most features appear near the center of the circle.
Considerations when exporting sequences from the Linear, Circular, or Sequence views:
- When exporting from the Circular view, the GenVision figure will be exported as circular. When exporting from the Linear or Sequence view, the GenVision figure will be exported as linear. Protein sequences are exported as linear.
- The colors for fonts, ORFs, features, and the Circular map title are chosen in the Style panel, and are preserved during export. For features, the Fill color is used for the feature color in GenVision. If a feature does not use the fill color (e.g., stroked shapes), then the line color is used. Unchecking the Fill checkbox will also cause the line color to be used. Feature labels are exported in the same color as the Shape.
- For linear images, the Vertical value in the Page Layout dialog (Windows / Macintosh) is used for the “Pages High” GenVision parameter.
- The page size and margin settings specified in the Page Setup dialog will be preserved in the exported GenVision project.
- An End Legend file is created for all of the panels within the export, and is named the same as your GenVision project with “_table” appended. For example, GenVisionProject_table.txt.
- All exported text files will be prefixed with SB to denote that they were exported from SeqBuilder Pro.
Considerations regarding features:
- Features are grouped into panels by feature type. One panel is created for each feature type.
- For each feature panel created, a corresponding panel is created for the feature labels. Feature labels are exported to GenVision if the Label Position is either Above or Below. Labels are not exported if position is Inside. For additional information, see The Style Panel.
- If your features have detached labels, note that the label settings found in Format > Horizontal Labels or Format > Radial Labels (for the Circular view and Format > Horizontal Labels or Format > Vertical Labels (for the Linear view) are used when exporting feature labels to GenVision.
- Features in SeqBuilder Pro that have the Fill checkbox checked in the Style panel will be exported to GenVision as a filled arrow. When the Fill checkbox is not checked, the feature will be exported as an open arrow.
- For protein sequences, the export does not include segment names for multi-segmented features.
Need more help with this?
Contact DNASTAR