
Gateway cloning is based upon the site-specific recombination of lambda bacteriophage, and is a two-part process. In the first part of the tutorial, you will create a Gateway entry clone. In the second part, you will use the entry clone as input for constructing the final Gateway expression clone.
- If you have not yet download and extracted the tutorial data, click here to download it. Then decompress (unzip) the file archive using the method of your choice.
- Use File > Open to open the demo file Tn5w.sbd. The sequence opens in the Linear view.
- Click on the neomycin/kanamycin resistance feature labeled aminoglycoside-3’-O-phosphotransferase to select that range of sequence.

- Select Cloning > Gateway Entry Clone to launch the Project window.
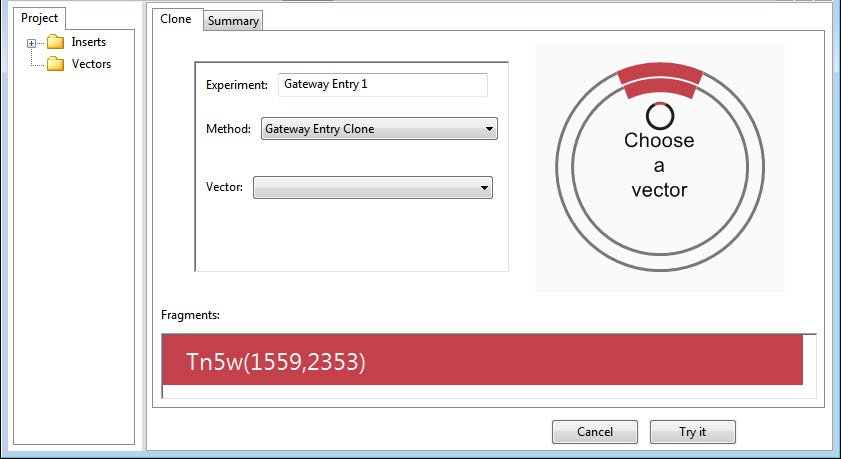
The selected sequence fragment has been placed in the Clone tab’s Fragments area and in the Project tab’s Inserts folder. To expand the Inserts folder and reveal its contents, click the plus icon (Win) or arrow (Mac).
The circular cartoon in the upper right corner displays the insert (in red) and prompts you to “Choose a vector.” The cartoon updates its appearance and text based on your selections.
- Use the Vector drop-down menu to select the donor vector pDONR201. Note that the menu has been optimized to contain suitable vectors for the chosen cloning method. In the current project, only circular vectors (
![]() ) are offered.
) are offered.
 ) are offered.
- Press the Try It button in the bottom right corner of the window. The Project view switches from the Clone tab to the Summary tab.
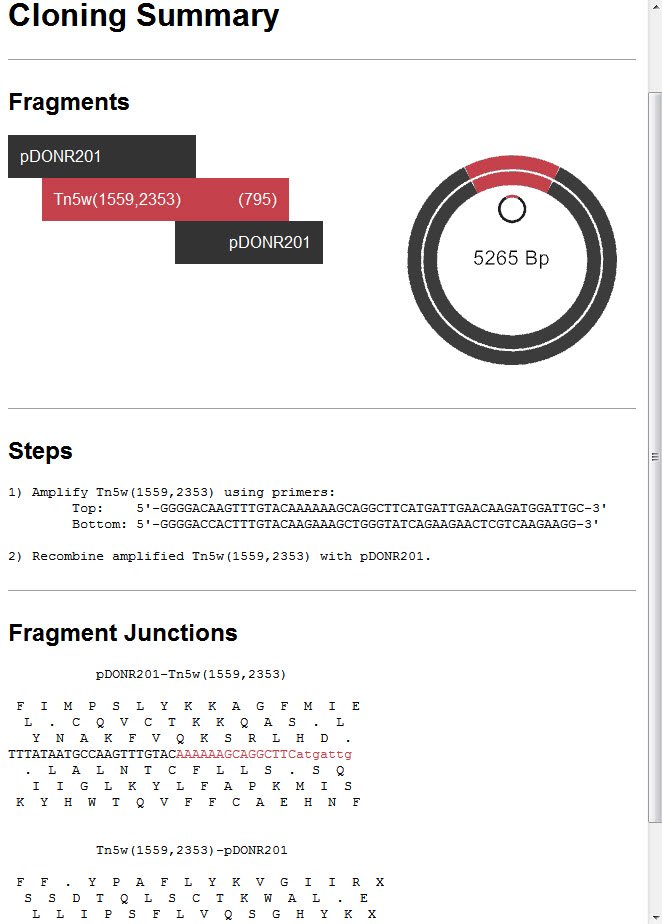
- Briefly look at the contents of the three sections: Fragments, Steps and Fragment Junctions. Then click Make It to proceed with the cloning simulation.
The L1-L2 Entry Clone 1 opens automatically in a new Document window. By default, the top pane shows the simulated clone in the Circular view.

- Click on the History tab at the bottom of the window to open the History view. This view shows the Cloning Summary last seen in Step 6. Since this summary contains the steps to make the entry clone, you may wish to print a copy.
- To see a print preview, click anywhere on the Cloning Summary to select it, and then choose File > Print. You could change the scale and/or print the summary from this window, if desired. However, there is no need to do so for this tutorial.
- On Windows, click the ‘x’ in the top corner to close the Print Preview window. On Macintosh, click the Cancel button.
Next, you will create the expression clone and (optionally) print a document that includes the steps to create the entry clone:
- Choose Cloning > Gateway Expression Clone to again open the Project window.
- Use the Vector drop-down menu to select the destination vector pAd/BLOCK-iT-DEST.
- Use the Clone drop-down menu to select Tn5w(1559,2353) L1-L2 Entry Clone 1 from the bottom of the list.
- Press Try It and then Make It.
- The Setup tab asks whether you wish to verify the clone. Press the Cancel button.
A new folder, Gateway Expression 2, is added to Project tab.

The Gateway Expression 2 Clone 1 opens automatically in a new Document window. As before, the top pane shows the simulated expression clone in the Circular view.

As before, the Cloning Summary appears in the History view.
- Click once on the Cloning Summary pane to select it.
- (optional) Use Edit > Select All, then File > Print to print the summary.
Need more help with this?
Contact DNASTAR