
You can use the tools at the top of the Feature Library Manager to control how features are displayed in the Manager, itself, and in the Annotation Results window after performing the auto-annotation procedure. This step is entirely optional.
For example, you could specify that all lacZ features be shown using light blue arrows outlined in purple. Later, when you looked for query matches in the Annotation Results window, all lacZ features would be displayed in the specified style. To try a similar workflow, see Try it! – Create a style set for CDS features.
The following table describes how to use the tools to change the appearance of features.
| Tool | Menu options | Lets you specify… |
|---|---|---|
Enzymes |
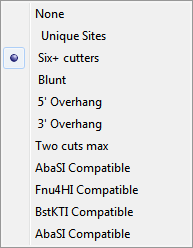 |
Whether to display a particular class of enzyme cut sites, or no cut sites, on both the Sequence and Linear views. The available selectors are a subset of those available using the Filter by Selectors check boxes in the upper pane of the main SeqBuilder Pro Document window. Note: When multiple features are selected from the Features view, no cut sites are displayed, regardless of the selection made here. |
Strand |
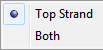 |
Whether to show the sequence for the top strand, or for both top & bottom strands, on the Sequence view. |
Ruler |
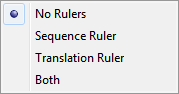 |
In the Sequence view, whether to place a ruler under the sequence, under the translation, neither, or both. Choosing Translation Ruler or Both causes a translation of the sequence to appear, along with the sequence. |
Translation |
 |
Whether to display translations in the Sequence view for 1 or 3 reading frames and for top and/or bottom strands. The options are similar to the Full Translation checkboxes in the upper pane of the main SeqBuilder Pro Document window. |
Features |
 |
Style options for annotations in the Sequence and Linear views.
|
Need more help with this?
Contact DNASTAR