
This tutorial demonstrates how to cut and clone a signal transduction gene into the pENTR/D-TOPO vector.
- If you have not yet download and extracted the tutorial data, click here to download it. Then decompress (unzip) the file archive using the method of your choice.
- Use File > Open to open N.thermophilus_his.sbd. The sequence opens in the Circular view.
- Click on the PAS/PAC sensor signal transduction feature to select it.
![]()

- Choose Cloning > Clone Selected Fragment.
- In the Clone tab on the right, choose the Method named PCR-Directed Restriction Clone.
- In the Vector drop-down menu, click on the plus sign next to Gateway Vectors, then the plus sign next to Entry Clones and select pENTR/D-TOPO.
![]()

- Press the Digest button. A specialized version of the Circular view opens.
- Select the range between the cut sites SacII and AscI, both located just below the “3 o’clock” position in the Circular view. Use any of these methods to select the range:
- Click on the enzyme label SacII in the Circular view and then Shift+click on the enzyme AscI.
- Click on the enzyme label SacII and then drag the mouse until the enzyme AscI is also selected.
- In the yellow bar at the bottom of the view, choose the Left Cut site SacII and the Right Cut site AscI.
![]()
- Click on the enzyme label SacII in the Circular view and then Shift+click on the enzyme AscI.

- Press the Select button. The Clone tab comes back into focus.
- Press Try it. Then press Make it.
In the Project tab on the left, note the appearance of two new files: the Restriction insert and Restriction Clone.

The Restriction Clone opens automatically in a new Document window. By default, the top pane shows the simulated clone in the Circular view.
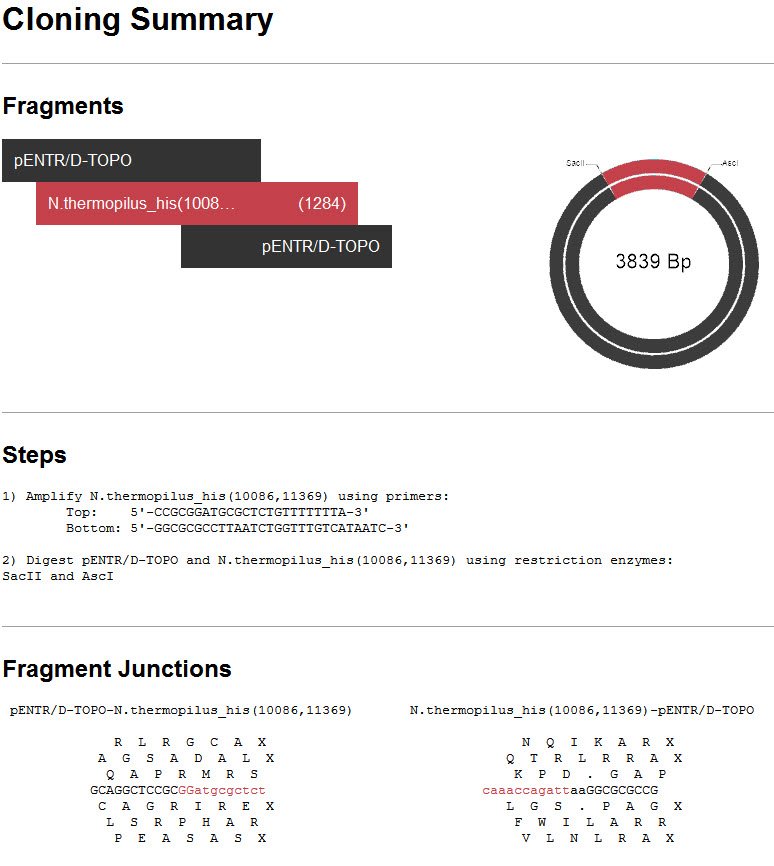
- Click on the History tab at the bottom of the SeqBuilder Pro window to see the Cloning Summary, including the steps needed to create this clone in your lab.
![]()
Need more help with this?
Contact DNASTAR